General Setups
The General Setups menu option is used to manage various setup details within the system, ensuring an organized and efficient configuration process. This section includes multiple tabs, each serving a distinct purpose: Integrations, Document Type, Decision Status, Stipulations, Other Costs, Templates, Pre-Qualification, Reference Guide, Approval Limits, Checklist, and Customer Flow Configuration. The Integrations tab records and manages third-party APIs and services that are integrated into the platform. The Document Type tab allows users to define the various document types required for business operations, ensuring all necessary documents are readily available. The Decision Status tab is used to configure status codes received from external credit decision systems and map them to internal order statuses. The Stipulations tab defines the conditions or requirements that must be met as part of a business agreement or decision-making process. The Other Costs tab records and manages different costs associated with the company’s operations. The Templates tab allows users to create and manage pre-designed document formats for reports, letters, or other forms, streamlining document creation across the platform. The newly added Pre-Qualification tab enables users to define prequalification parameters based on Credit Score Range and Financed Amount. The Reference Guide tab allows users to upload reference guides for access within the system. The Approval Limits tab enables users to define and manage approval limits based on criteria such as user role, credit score, customer rating, and financed amount. The Checklist tab allows users to create and manage checklists by defining details such as checklist name, applicant type, lease type, product, category, description, and whether the checklist is mandatory. The Customer Flow Configuration tab allows users to define and manage customer journey configurations by specifying the journey entry point, associated workflow, and applicable dealership. Together, these setups provide a comprehensive approach to managing key system configurations, enhancing operational efficiency and accuracy.

Integrations
The Integrations tab is used to record and manage APIs and other services integrated into the Index platform. This section allows users to view and manage all external integrations, ensuring smooth interoperability with external systems. The screen displays Integration Types and Integration Providers, providing users with a clear and organized overview of all connected services. Efficient management of these integrations ensures that all APIs and services function optimally within the Index platform.

To manage integrations, follow these steps:
- Add New Integration: Click this button to add a new integration. Ensure that the integration does not overlap with any existing integration. a. Select Integration Type: Choose the type of integration from the drop-down list. Available options include Payment Processing, Customer Management, Inventory Management, F&I Products, Fraud Identification, Identity Verification, Location Services, Co-browsing, Purchase Insurance, Calculation & Taxation, E-Signatures, Pricing Program, Credit Decisioning, Contracting, Tagging, Credit Bureau, Proposal Submission, and Payoff Quotes. b. Select Route: Choose the appropriate route for the selected integration type from the drop-down list. c. Select Provider: Based on the selected route, choose the service provider from the drop-down list. d. Input Credentials: Enter the credentials provided by the chosen provider, such as the API Secret Key and API Version.
- Select Status: Records with Status Enabled will be available for use, while records with Status Disabled will not be accessible in the future.
- Managing Existing Integrations: Already added integration records are displayed in a tree hierarchy. A Search Bar is available to filter records based on search criteria. An ellipsis menu is located on the right side of each integration type to Add Provider. For each integration provider, another ellipsis menu allows users to Delete Provider.

Document Type
The Document Type tab is used to define various document types required for business operations. Once defined, these document types are available in drop-down lists throughout the system where needed. This setup enables users to manage the Code, Description and Status of each document type. Examples of document types include proof of income, proof of employment, proof of residence, bank statements, driver’s licenses, salary slips and more. Users can easily add new records, edit existing ones or delete unnecessary records, ensuring comprehensive management of all document types.

To manage document types, follow these steps:
- Add New Document Type: Click this button to add a new document type. Note that document type codes must be unique and users cannot assign a code that overlaps with an existing one.
- Input Code: Enter the unique code for the respective document type. This code will be specific to each document type and can be referenced as needed throughout the system.
- Input Description: Enter the name or details for the document type. For example, this could include salary slips, bank statements, driver’s licenses, etc.
- Select Status: Records with Status Enabled will be available for use, while those with Status Disabled will not be available for future operations.
- Managing Existing Records: Already added document types are displayed in tabular form. A Search Bar is provided to filter records based on specific criteria. An ellipsis menu is available to the right of each record to Edit/Delete the respective document type.

Decision Status
Decision Status is used to define decision status codes that will be received from the credit decision-making system and mapped to order statuses. Decision statuses can include approved, canceled, conditioned, draft, submitted and more. The screen includes columns for Response Code, Response Description, Order Status and Status, enabling users to manage and align decision statuses accurately. This ensures that the system reflects the correct order statuses based on credit decisions, facilitating smooth and efficient order processing.

To manage decision statuses, follow these steps:
- Add New Decision Status: Click this button to add a new decision status. Note that response codes must be unique and users cannot assign a code that overlaps with an existing response code.
- Input Response Code: Enter the unique code assigned to the respective decision status. This code is specific to each record and can be referenced as needed.
- Input Response Description: Enter the description associated with the decision status.
- Select Order Status: Choose the corresponding order status such as approved, canceled, conditioned, draft, submitted, etc.
- Select Status: Records with Status Enabled will be available for future use, while records with Status Disabled will no longer be accessible.
- Managing Existing Records: Decision statuses that have already been added are displayed in tabular form. A Search Bar is available at the top of each column to filter records based on search criteria. An ellipsis menu is provided on the right side of each record to Edit/Delete the respective decision status.

Stipulations
Stipulations are specific conditions, requirements or terms that must be fulfilled as part of an agreement or credit decision-making process. These stipulations can vary depending on the nature of the transaction and are often used to ensure compliance with regulatory standards or reduce risk. In this system, the Stipulations section allows users to configure and manage these conditions effectively, ensuring they are clearly defined and easily tracked. The window includes columns for Stipulation Code, Stipulation Type, Parameter, Document Type, Assignee and Message Description, helping users to organize and monitor stipulations related to credit approval.

To manage stipulations, follow these steps:
- Add New Stipulation: Click this button to add new stipulation details. Ensure that the stipulation code does not overlap with any existing code.
- Input Stipulation Code: Enter the unique code assigned to the stipulation. This code is specific to each record and can be referenced whenever needed.
- Select Stipulation Type: Choose the type of stipulation, such as financial, non-financial or general.
- Select Parameter: Based on the stipulation type, select a relevant parameter. For example, for financial stipulations, parameters might include financed amount, monthly payment or terms, while non-financial stipulations could involve upload document.
- Select Document Type: Choose the document type required when the parameter is set to upload document.
- Select Assignee: Indicate who is responsible for the stipulation, this could be the dealer, customer or both.
- Message Description: Provide a description related to the stipulation. For instance, for a financial stipulation with the parameter of monthly payment, you might write details about the required income information.
- Managing Existing Records: Stipulations that have already been added are displayed in a tabular format. A Search Bar at the top of each column allows you to filter records based on search criteria. An ellipsis menu is available on the right side of each record to Edit/Delete the respective stipulation.

Other Costs
The Other Cost tab is used to define various other costs required for business operations. These other costs can be selected as part of the Non-Asset Based Interest Rate chart and are available in drop-down lists throughout the system. Users can define the code, description and status for each other cost, ensuring these records are easily managed and accessed when needed. This setup guarantees accurate tracking of all other costs, supporting efficient business operations.

To manage Other Costs, follow these steps:
- Add New Other Cost: Click this button to add a new other cost. Note that each other cost must have a unique code and overlapping codes are not allowed.
- Input Code: Enter the unique code assigned to the other cost. This code will be used for referencing the respective other cost throughout the system.
- Input Description: Enter the name or description of the other cost. For example, this could include various operational or overhead other costs.
- Select Status: Choose whether the other cost is Enabled or Disabled. Enabled other costs will be available for use, while disabled other costs will not.
- Managing Existing Records: Already added other costs are displayed in a tabular format. Use the Search Bar at the top of each column to filter other costs by specific criteria. The ellipsis menu next to each record allows you to Edit/Delete the respective other cost.

Templates
The Template tab is used to create new document templates, edit existing ones and configure predefined document templates within the system. Templates are essential for maintaining consistency in documents like reports, letters and contracts by using predefined formats that simplify the process of generating professional-looking documents.
Add/Edit a Template:
-
Add New Template: Click this button to create a new document template.

-
Select Storage Location and Format: Choose where the template will be stored and select the format from the drop-down list. Options include Word, SMS or Email.
-
Input Name of Template: Enter the name of the new template.
-
Disable Template: Click on the disable option if you wish to make the template inactive.
-
Input Template Contents: Fill in the content for the template, including any placeholders or formatted text.
-
Edit Template: Click this option to modify the content or settings of an existing template.

Add New Template Configuration
Templates serve as pre-designed layouts for documents, such as loan agreements, contracts or financial statements. This makes it easier to generate consistent and standardized documents for different operations. The template management screen includes columns for Code, Name, Event, Type and Status to help users keep track of and organize templates effectively.

To configure existing templates, follow these steps:
- Add New Template Configuration: Click this button to configure a new template. Each template must have a unique code. You will need to provide the following details: Code, Name, Status, Applicable Financed Types, Dealer, State, Co-Applicant, Event, Type, Recipient and the Template itself.
- Input Code: Enter a unique identifier for the template. This code is used to reference the template configuration throughout the system.
- Input Name: Provide a name that accurately describes the template configuration for easy identification.
- Select Event: Choose the specific event or scenario in which the template will be applied, such as loan approval or contract generation.
- Select Type: Choose the format of the template, whether it’s an email, SMS or document.
- Select Status: Choose whether the template configuration is Enabled or Disabled. Enabled templates are available for use in the system, while disabled templates are inactive and cannot be used.
- Managing Existing Templates: Templates that have already been configured are displayed in a tabular format. Use the Search Bar at the top to filter templates based on different criteria. The ellipsis menu next to each record allows you to Edit or Delete the respective template.

Pre -Qualification
The Pre-Qualification tab is used to define pre-qualification parameters based on Credit Score Range and Financed Amount. This screen includes columns for Credit Score Range, Financed Amount, and Status, enabling users to effectively organize and manage pre-qualification parameters.

To manage Pre-Qualification, follow these steps:
- Add New Range: Click this button to add a new pre-qualification range.
- Select Credit Score Range: Choose a credit score range from the drop-down list. This list is populated with credit score ranges defined under the Credit Score tab in Program Setups.
- Input Financed Amount: Enter the financed amount applicable to the selected credit score range for pre-qualification.
- Select Status: Choose whether the respective pre-qualification range is Enabled or Disabled. Enabled ranges will be available for use, while disabled ranges will not be accessible.
- Manage Existing Records: Pre-qualification ranges that have already been added are displayed in a table format. Use the Search Bar at the top of each column to filter ranges by specific criteria. The ellipsis menu next to each record allows you to Edit or Delete the respective record.

Reference Guide
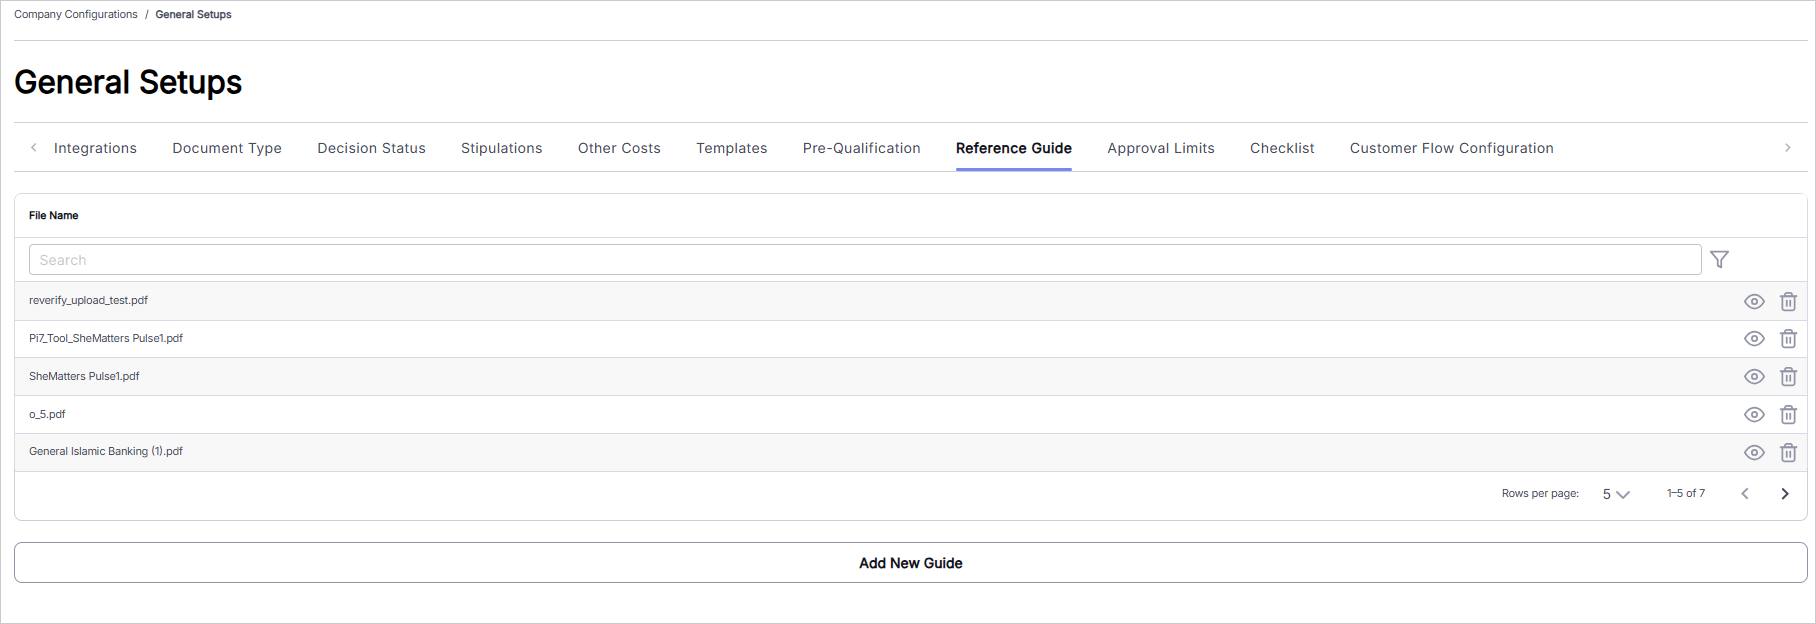
The Reference Guide tab is used to upload and manage reference guides that are made available to users of the associated dealership. This section allows users to add, view, and delete reference guides configured at the tenant level. Access to the Reference Guide is controlled through permissions and dealership level configuration, ensuring that only authorized users can access the available guides.
To manage reference guides, follow these steps:
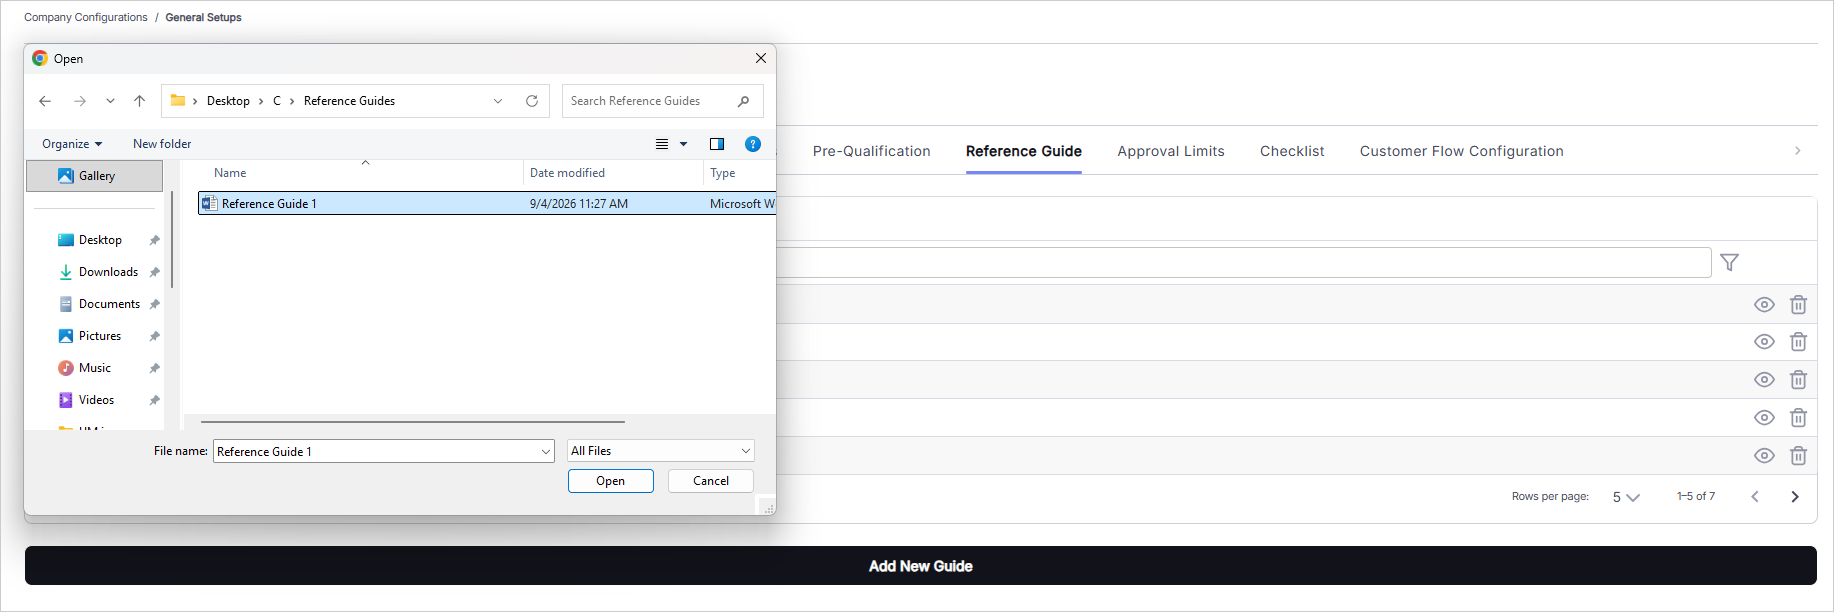
- Add New Guide: Click this button to add a new reference guide. Add the required guide to make it available to authorized users.
- View Existing Guides: Existing reference guides are displayed in the Reference Guide section. Users can select a guide to view its content.
- Delete Existing Guides: Use the available delete option to remove an existing reference guide from the list.
Approval Limits
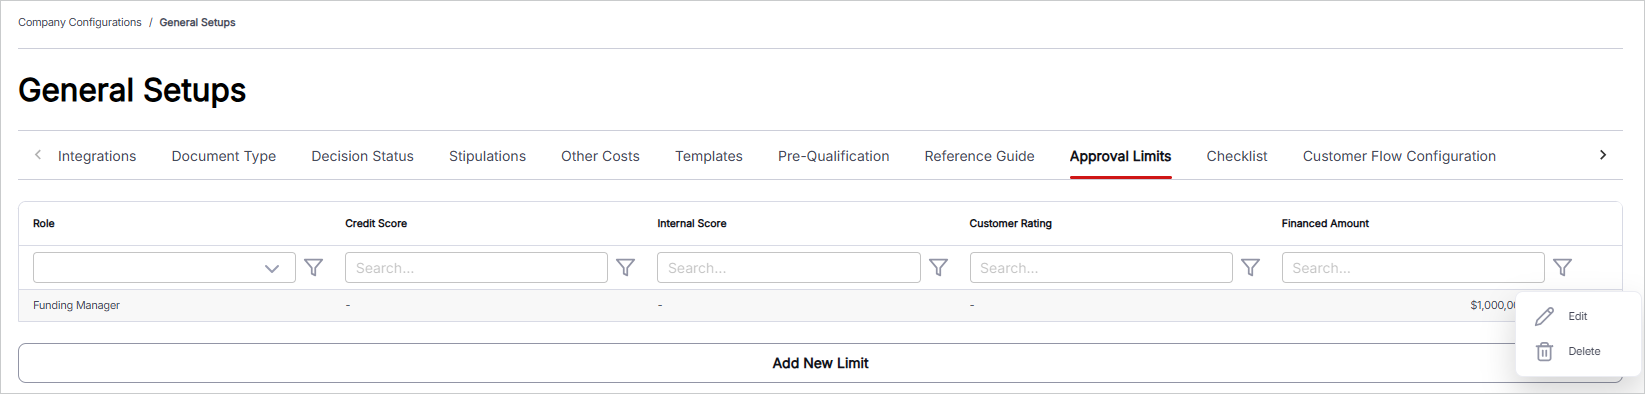
The Approval Limits tab is used to define and manage approval limits for different user roles based on specific credit and customer criteria. These limits help determine the maximum financed amount that can be approved by users with different roles, ensuring that approval decisions are aligned with defined business requirements. The window includes details such as Role, Credit Score, Internal Score, Customer Rating and Financed Amount, allowing users to clearly define and monitor approval limits.
To manage approval limits, follow these steps:
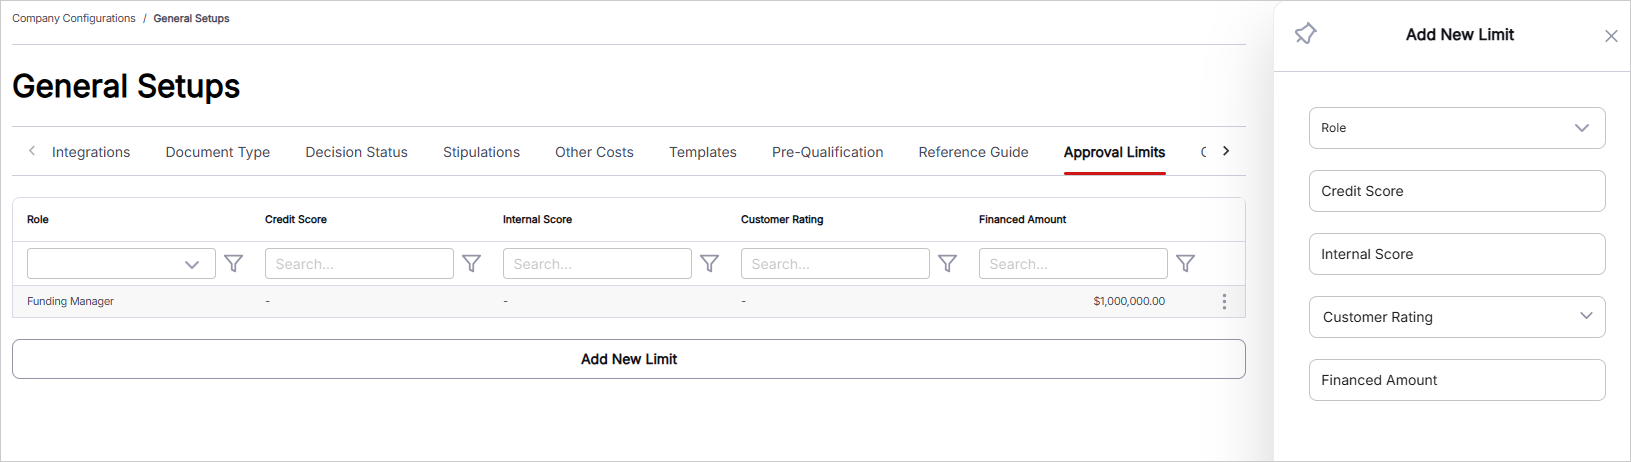
- Add New Approval Limit: Click this button to add new approval limit details. Define the appropriate criteria and financed amount for the selected user role.
- Select Role: Choose the applicable user role from the drop-down list. Available roles may include Credit Analyst, Credit Manager, Funding Analyst, Funding Manager, and other configured roles.
- Input Credit Score: Enter the credit score applicable to the approval limit.
- Input Internal Score: Enter the internal score applicable to the approval limit.
- Select Customer Rating: Choose the applicable customer rating from the drop-down list, such as All, Very Good, Good, Fair, Caution, and other configured ratings.
- Input Financed Amount: Enter the financed amount that represents the approval limit for the defined criteria and user role.
- Managing Existing Records: Approval limit records that have already been added are displayed in a tabular format. A Search Bar is available on each column to filter records based on search criteria. An ellipsis menu is available on the right side of each record to Edit/Delete the respective approval limit.
Checklist
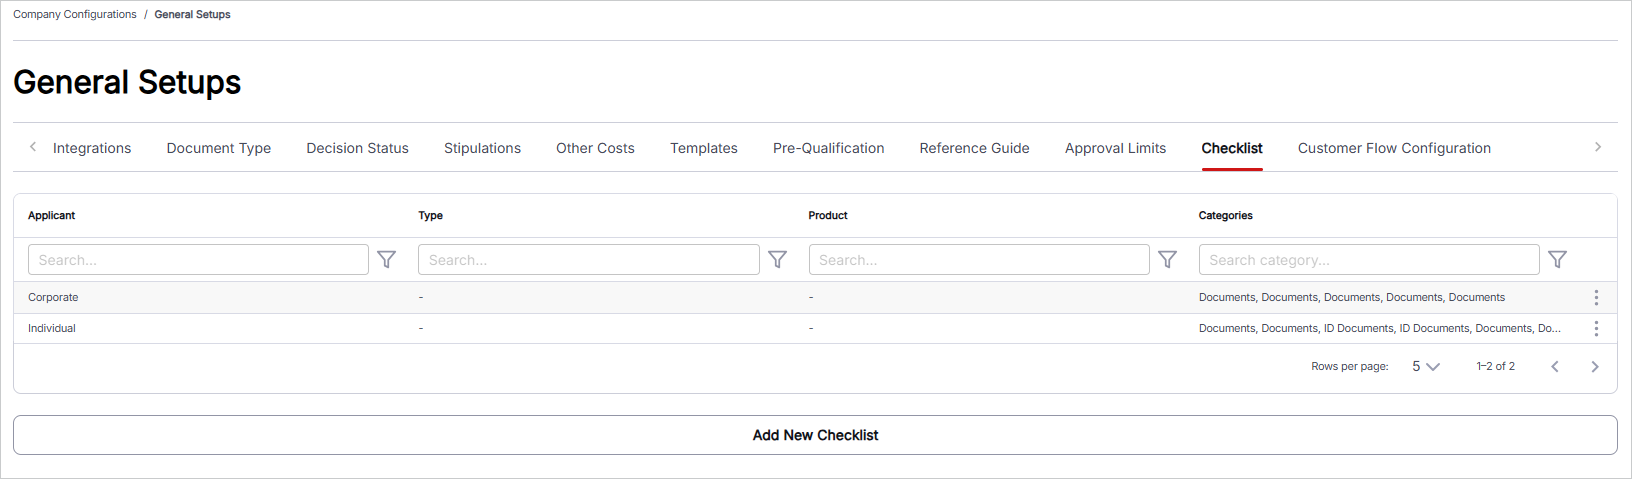
The Checklist tab is used to create and manage checklists for different applicants, lease types, products, and document categories. Checklists help users define the required items or documents for a specific business scenario and indicate whether each item is mandatory. The window includes details such as Checklist Name, Applicant, Lease Type, Product, Category, Description, and Mandatory, allowing users to organize and manage checklist requirements effectively.
To manage checklists, follow these steps:
-
Add New Checklist: Click this button to add a new checklist. Define the checklist details based on the applicable applicant, lease type, product, and category.
-
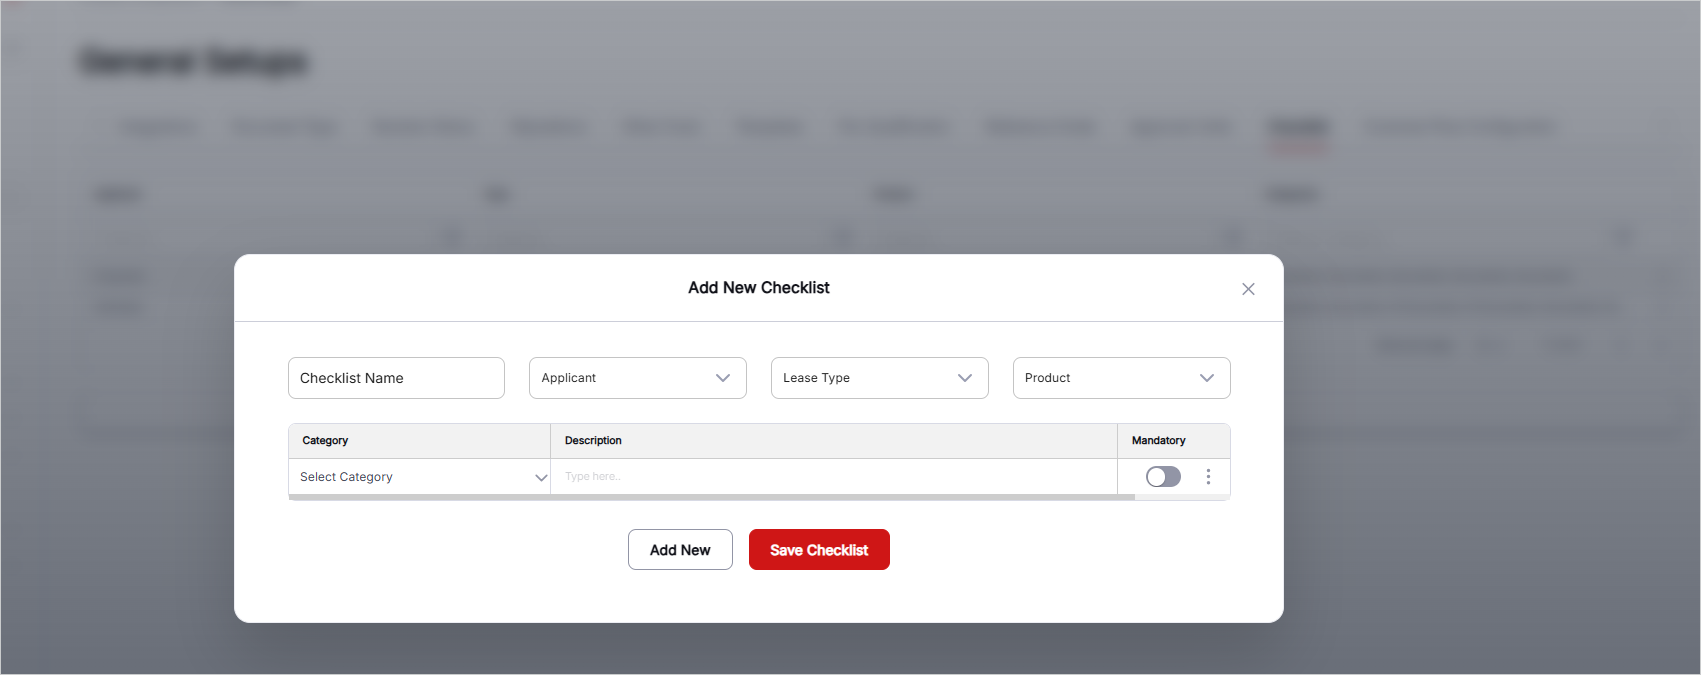
Input Checklist Name: Enter the name of the checklist. This name identifies the checklist record and can be referenced whenever needed.
-
Select Applicant: Choose the applicable applicant type from the drop-down list, such as Corporate or Individual.
-
Select Lease Type: Choose the applicable lease or finance type from the drop-down list, such as Lease, Finance, Hire Purchase, or Operating Lease.
-
Select Product: Choose the applicable product from the drop-down list, such as Auto Loan, Equipment Lease, or other configured products.
-
Select Category: Choose the applicable category from the drop-down list. Available options may include All, Bank Statement, ID Documents, Property Documents, and other configured categories.
-
Description: Enter a description that explains the purpose or requirements of the respective checklist.
-
Select Mandatory: Enable or disable the Mandatory option to indicate whether the checklist requirement is mandatory.
-
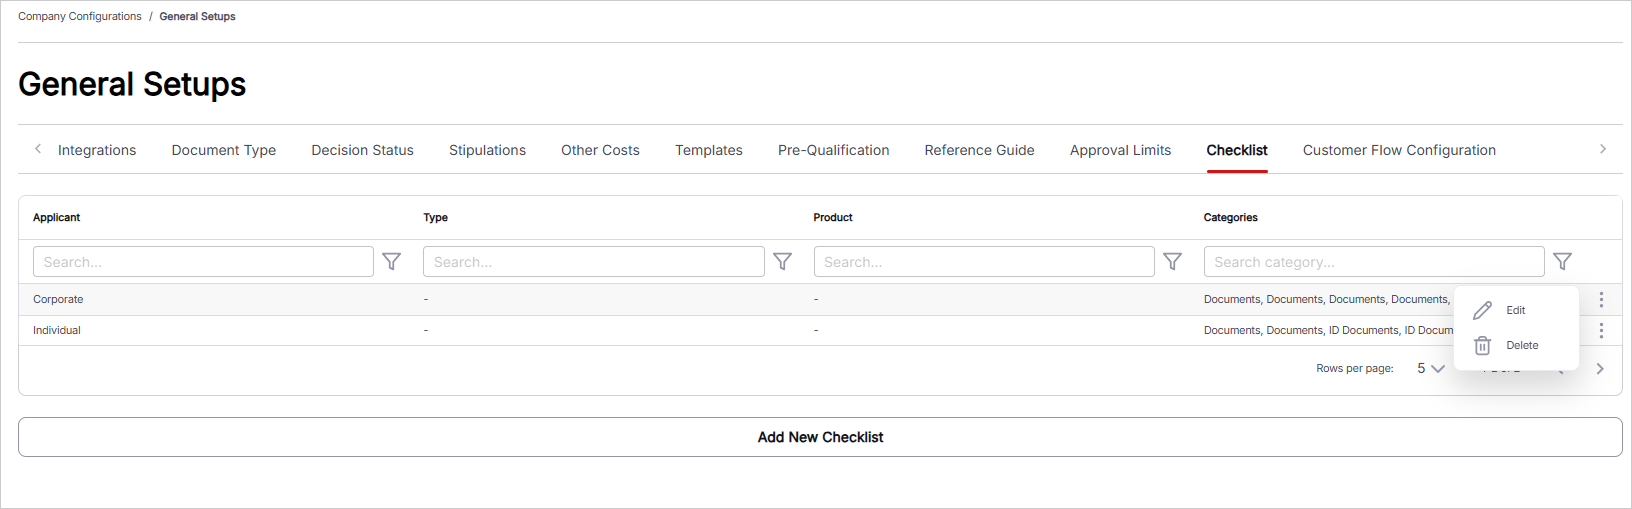
Managing Existing Records: Checklists that have already been added are displayed in a tabular format. A Search Bar is available on each column to filter records based on search criteria. An ellipsis menu is available on the right side of each record to Edit/Delete the respective checklist.
Customer Flow Configuration
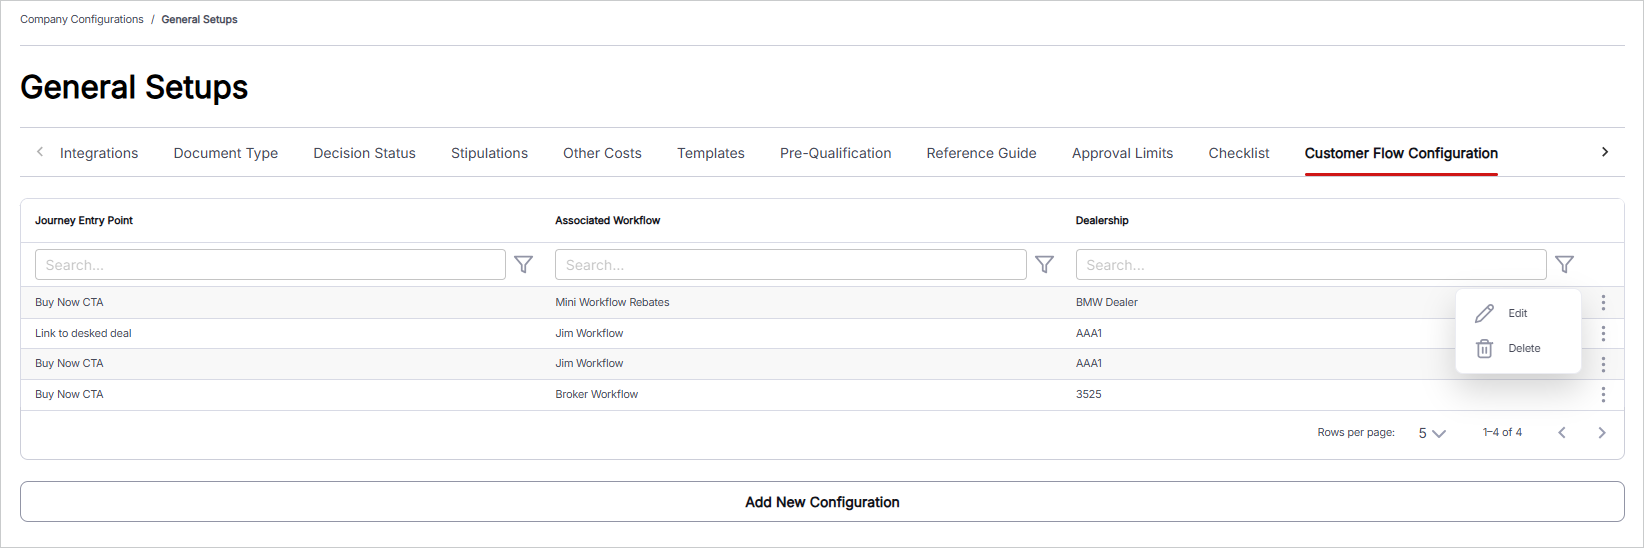
The Customer Flow Configuration tab is used to define and manage customer journey configurations for different entry points, workflows, and dealerships. This section allows users to associate a specific customer journey entry point with the appropriate workflow and select the dealerships where the configuration should apply. The window includes details such as Journey Entry Point, Associated Workflow, and Dealerships, helping users manage customer flow configurations effectively.
To manage customer flow configurations, follow these steps:
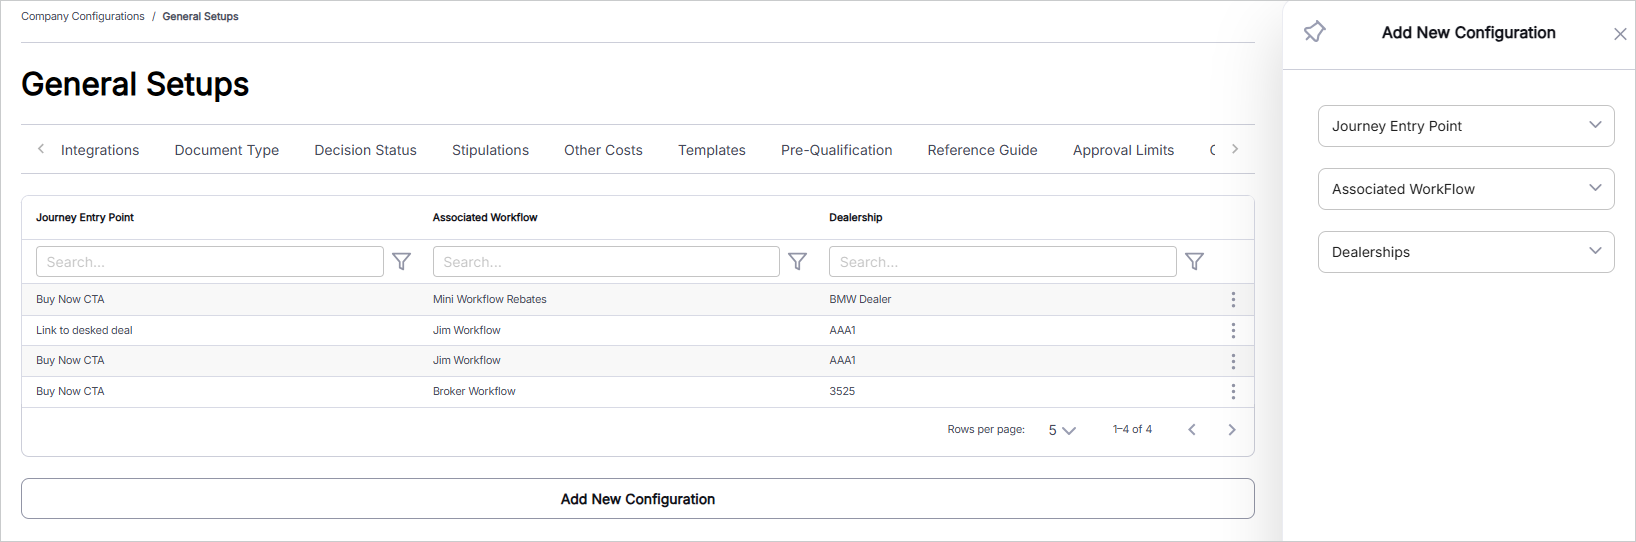
- Add New Customer Flow Configuration: Click this button to add a new customer flow configuration. Define the applicable journey entry point, workflow, and dealership.
- Select Journey Entry Point: Choose the starting point of the customer journey from the drop-down list. Available options include Buy Now CTA, Pre-Approval CTA, Trade-In CTA, and Linked to Desked Deal.
- Select Associated Workflow: Choose the workflow associated with the selected journey entry point. Available options may include Broker Workflow, Dealer Workflow, Rebates Workflow, and other configured workflows.
- Select Dealerships: Select the dealerships to which the customer flow configuration should apply. Use the Select All option to apply the configuration to all dealerships or select individual dealerships as required.
- Managing Existing Records: Customer flow configurations that have already been added are displayed in a tabular format. A Search Bar is available on each column to filter records based on search criteria. An ellipsis menu is available on the right side of each record to Edit/Delete the respective configuration.