Company Configurations
The Company Configurations section allows you to manage the core settings that define your company’s structure, processes and key business parameters. This section includes the following sub-menus:
- Company Profile: Manage essential company details, including Profile, Address, Personalization settings, Language preferences, Documents upload and Pricing.
- Asset Setups: Configure asset-related options, such as defining Option Categories and OEM Options.
- Order Setups: Set parameters for order management, including Contract Annual Mileage, Contract Term, Fees and Business Trading Age requirements.
- General Setups: Manage various operational configurations, such as Integrations, Document Types, Decision Status, Stipulations, Other Costs and Templates for documents.
- Program Setups: Define program-specific criteria, including Asset Catalogue, Asset Condition, Asset Usage, Annual Mileage, Term, Credit Score, Financed Amount and Business Unit details.

Company Configurations
Company Profile
The Company Profile section offers a user-friendly interface for managing your organization’s essential information. It features dedicated tabs for Profile, Address, Personalization, Language, Documents and Pricing enabling users to easily configure and update all relevant details in one centralized location. This section will guide you through each tab, ensuring a precise and complete setup of your Company Profile to meet your business requirements.

Company Profile
Profile
The Profile tab within the Company Profile section allows you to input and configure key information about your organization. This tab includes various fields for entering company details, selecting operational preferences and setting default options for efficient system operations. Below is a breakdown of each field available on the Profile tab:

Profile
- Company Name: Enter the official name of your company.
- Company Trading Name: Input the trading or business name if different from the official company name.
- Company Website: Provide the URL of your company’s official website.
- Email: Enter the primary email address for company correspondence.
- Correspondence Email: Input the dedicated email address for correspondence purposes.
- Tax ID: Input your company’s Tax Identification Number.
- Mileage Units: Select the unit of measurement for mileage (Miles or Kilometers) from the drop-down list.
- Default Search Radius: Choose a default search radius (e.g., 10 miles, 20 miles) based on the selected Mileage Unit.
- Initials: Input the company’s initials, typically used for identification in reports or internal documentation.
- Country: Select the country your company operates in from the drop-down list.
- Preferred Currency: Choose the currency most frequently used by your company.
- Default Currency: Select the default currency for your company’s transactions.
- Slug: Enter a unique identifier (slug) for your company, often used in URLs.
- Min Odometer for Prior Use: Input the minimum odometer reading required for previously used assets.
- Credit Decision Expiry Days: Enter the number of days after which a credit decision expires.
- Time Zone: Select the applicable time zone from the drop-down list.
- Daylight Saving Applicable: Select "Yes" or "No" to indicate whether daylight saving time is applicable.
- Contact Person Name: Input the name of the primary contact person for the company.
- Contact Person Phone: Enter the phone number of the contact person.
- Domain: Provide the company’s domain name (e.g., companyname.com).
- Minimum Duration of Current Address (Optional): Specify the minimum period required for the current address of a customer.
- Credit Response Cushion Time (Optional): Enter a time delay (in minutes) for capturing credit application responses. This optional field accepts a numeric value from 0 to 99, with a default set at '0' (blank if not configured). Non-zero values will apply a delay accordingly.
Address
The Address tab allows you to manage your company’s address details, with options to record three different types of addresses: mailing address, invoice address and office address. Country-specific address templates are provided for each address type, including fields for address lines, city, state, ZIP code and country.

Address
Mailing Address:
The mailing address is the default and required address type, used for the company's correspondence, such as sending postal mail.
Invoice Address:
This address is optional and is used specifically for invoicing purposes, such as where payments for goods or services are directed.
Office Address:
The office address is also optional and serves to specify the company’s physical location for business operations.
Personalization
The Personalization tab allows users to tailor the visual elements of the company's profile to align with branding guidelines. This tab includes options to customize colors and upload brand-specific icons and logos, ensuring the company’s identity is reflected throughout the platform.

Personalization
- Primary Color: Set the company’s main brand color, which will be prominently featured in the profile and across interface elements.
- Secondary Color: Choose a complementary color to the primary, often used for accents and highlights to enhance the overall visual appeal.
- Favicon: Upload a small icon (favicon) that appears in the browser tab to make the company’s profile instantly recognizable.
- Logo: Upload the company’s logo, ensuring consistent brand representation on the profile and across the platform.
Language
The Language tab enables users to manage multilingual content for the company's profile, allowing the profile to be accessible to a global audience. The tab features columns for Placeholders, English (as the default language) and additional columns for other supported languages. Users can translate the content from English into various languages, ensuring a seamless multilingual experience.

Language
- A search bar is provided at the top of each column to filter records based on search criteria.
- The Placeholder column lists text placeholders used throughout the company's profile. These placeholders represent specific text elements that can be translated into different languages.
- The English (Default) column contains the content in English, which serves as the base language for translations. Users can input or edit the English content as necessary.
- Additional columns, such as Spanish, German, Chinese, etc., contain translated content corresponding to the English placeholders. Users can input translations to ensure the profile is accessible in various languages.
- An ellipsis menu on the right side of each record allows users to Edit or Delete the respective placeholder or content.
- Add New Placeholder allows users to add additional placeholders, providing flexibility for more text elements and broader multilingual support.
- Add New Language enables users to add a new language and choose whether it should be set as the default language for the company's profile.
Documents
The Documents tab allows users to upload and manage documents relevant to the company. Documents are stored in the storage path defined under the user's account settings.

Documents
To manage documents, follow these steps:
- Add New Document: Click on the Drag and drop file or browse to upload a document. Once the document is uploaded, the system automatically records the Uploaded By user and the Date/Time of upload, ensuring proper tracking and documentation.
- View Document: Click the Eye Sign to view the uploaded file. This provides a quick and easy way to access documents.
- Delete Document: To remove a document, select the ☒ option next to the document. Once deleted, the document will no longer be accessible.
Pricing
The Pricing tab is used to configure company-level pricing. Pricing can be set up based on either Standard Rates or Standard Charts, allowing flexibility in managing pricing strategies. This section streamlines the configuration of pricing, ensuring that rates and conditions are aligned with company policies.

Pricing
Standard Rates
The Standard Rates configuration allows for setting specific percentages for financing elements, such as down payments, residual values and customer rates. These configurations are applicable to available finance types, including Lease and Finance.

Pricing on Standard Rates
To manage pricing for Standard Rates, follow these steps:
- Select Standard Rates from Pricing: Choose Standard Rates from the Pricing drop-down menu.
- Input Down Payment (Optional): Enter the down payment percentage if applicable.
- Input Min Down Payment (Optional): Specify the minimum acceptable down payment percentage.
- Input Max Down Payment (Optional): Specify the maximum allowable down payment percentage.
- Input RV/Balloon (Optional): Enter the percentage for residual value or balloon payment, if required.
- Input Customer Rate (Optional): Enter the customer rate percentage to serve as the basis for financing calculations.
Standard Charts
The Standard Charts configuration allows pricing to be set based on pre-defined charts under the Charts menu option in Pricing Configurations. This approach offers flexibility by letting companies choose among various interest rate, commission, RV/Balloon and fee charts as pricing criteria.
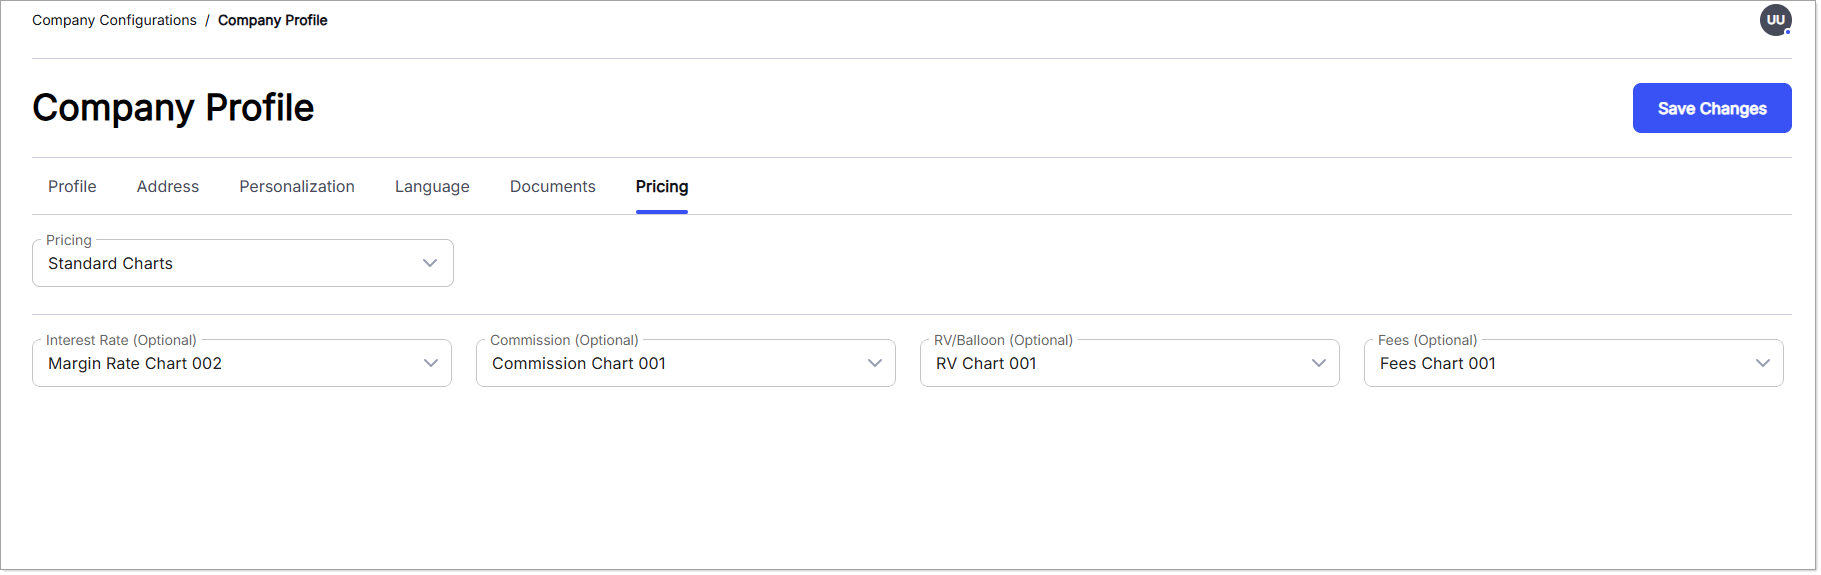
Pricing on Standard Charts
To manage pricing for Standard Charts, follow these steps:
- Select Standard Charts from Pricing: Choose Standard Charts from the Pricing drop-down list.
- Select Option Interest Rate (Optional): Select an interest rate chart from the drop-down list, which displays enabled interest rate charts configured under Charts in Pricing Configurations.
- Select Option Commission (Optional): Choose a commission chart from the drop-down list, populated with enabled commission charts under the Charts menu.
- Select Option RV/Balloon (Optional): Choose an RV/Balloon chart from the available options in the drop-down list of enabled charts under the Charts menu.
- Select Option Fees (Optional): Select a fees chart from the drop-down list of enabled fees charts under the Charts menu.
- Note: When determining pricing (rates or charts) during order creation, the system applies priority as follows:
- For Company: Pricing configured under the Pricing tab in the Company Profile.
- For Dealer: Preferences set in the Preferences tab of the Dealer Profile under Dealer Configurations.
- For Lender: The Pricing Program selected in the Lender Profile under Lender Configurations.
Asset Setups
The Asset Setups menu allows users to configure and manage asset-related add-ons within the system. It includes two key sub-menu options: Add-On Category and OEM Add-Ons. Add-On Category organizes asset options by recording and managing categories that classify various features or components. OEM Add-Ons tracks original equipment manufacturer (OEM) parts, which are identical to the parts installed on a vehicle when it was originally built. Together, these ensure that assets and their components are well-organized and easily accessible for smooth system management.

Asset Setups
Add-On Category
Add-On Categories refers to the classification of various optional features or accessories that can be added to an asset. These categories help streamline the organization and management of add-ons like interior design elements, alloy wheels, maintenance packages and protection plans. By grouping these add-ons into categories, users can efficiently navigate and select the appropriate enhancements for an asset, ensuring a structured and organized approach to managing available features. The Add-On Categories tab records and manages these classifications within the system, displaying columns for Code, Description and Status to ensure accurate tracking and easy access to all add-on categories.

Add New Add-On Category
To manage add-on categories, follow these steps:
- Add New Add-On Category: Click the "Add New Add-On Category" button to create a new add-on category.
- Input Code: Enter a unique code that represents the specific add-on category. This code serves as a reference for the category and is used throughout the system where applicable.
- Input Description: Provide a description of the add-on category. Examples of add-on categories include interior design, alloy wheels, maintenance and protection.
- Select Status: Choose the status for the add-on category. Records with an Enabled status will be available for further use, while records with a Disabled status will be restricted from future use.
- View and Manage Existing Add-on Categories: Existing add-on categories are displayed in a table format. A search bar is provided at the top of each column to filter records based on search criteria. An ellipsis menu on the right side of each record allows users to Edit or Delete the respective add-on category.

Add-on Category
OEM Add-Ons
OEM (Original Equipment Manufacturer) Add-Ons refer to additional features or accessories provided by the original manufacturer of an asset. These add-Ons may include technological upgrades, aesthetic enhancements or performance improvements. OEM add-ons are typically available during the initial purchase or as aftermarket additions and are specific to the manufacturer's products, ensuring compatibility and quality. In this section, users can record and manage OEM aad-on, which will also be available when configuring Dealer Add-Ons under Dealer Configurations. The window includes columns for Product Name, Description, Category, Status, Supplier, Part No., Installation Mode, Compatible Assets, Price and RV on Option, ensuring detailed tracking and management of OEM add-Ons.

Add New OEM Add-Ons
To manage OEM Add-Ons, follow these steps:
- Add New OEM Add-Ons: Click the Add New OEM Add-Ons button to add a new OEM add-On to the system.
- Product Name: Enter the name of the product manufactured by the OEM that can be used in another company's asset. For example, a security alarm made by Company A can be installed in a car produced by Company XYZ.
- Description: Provide a detailed description of the product, outlining its features and specifications. For example, describe the security alarm’s capabilities and technical details.
- Category: Select the category under which the OEM add-ons falls. This dropdown is populated with add-ons defined under the Add-On Category tab. For example, a security alarm may be categorized under "Security Systems."
- Status: Select whether the OEM add-on is Enabled or Disabled. Enabled add-ons will be available for further use, while disabled add-ons will be restricted from future use.
- Supplier: Input the name of the supplier for the OEM add-on.
- Part No.: (Optional) Enter the part number for the OEM add-on. This helps in tracking and referencing the specific part.
- Installation Mode: Choose whether the OEM add-on is Pre-Installed or Optional from the dropdown menu.
- Compatible Assets: Select from the list of compatible assets (models or trims) that can use the OEM add-on. This dropdown is populated with assets defined under the Asset Catalogue in the Programs Setup within the Company Configuration menu. For instance, the security alarm may be compatible with specific vehicle models (e.g., Model X, Y, Z).
- Price: Enter the price of the OEM add-on.
- RV on Add-On: Input the residual value (RV) for the OEM add-on, which can impact the asset's future valuation.
- Upload File/Video/Brochure URL: Users can upload a file, add a video URL or provide a brochure URL to supplement the OEM add-on with relevant resources such as product documentation, promotional material or installation guides.
- Manage Existing OEM Add-Ons: Existing OEM options are displayed in a tabular format. A Search Bar is available at the top of each column to filter records based on search criteria. An ellipsis menu next to each record allows users to Edit or Delete the respective OEM add-on.

OEM Add-Ons
Deal Setups
Deal Setups provide users with a streamlined approach to managing essential configurations related to deals, now featuring additional tabs for greater functionality. These include Contract Annual Mileage, Contract Term, Fees, Business Trading Age, F&I Marketing Materials and Rebates. The Contract Annual Mileage tab allows you to define allowable mileage per year for contracts, ensuring compliance with company policies. The Contract Term tab helps configure contract lengths that can be applied across various dealer systems. The Fees tab enables the management of various fees associated with deals, while the Business Trading Age tab allows you to specify acceptable trading age ranges for businesses. The F&I Marketing Materials tab provides a platform to upload and manage marketing materials related to Finance and Insurance (F&I) products, making them easily accessible for dealers. The Rebates tab enables users to define and manage rebates that can be applied to deals, offering greater flexibility in pricing strategies. This centralized and expanded setup ensures efficiency and consistency in managing deal-related configurations.

Deal Setups
Contract Annual Mileage
The Contract Annual Mileage tab is used to configure the allowed annual mileage for contracts within the system. These values are stored in the backend and are available as parameters while creating or configuring a quotation. The tab provides fields for Code, Value and Status, ensuring that all contract mileage options are correctly configured and easily managed.

Add New Contract Annual Mileage
To manage Contract Annual Mileage, follow these steps:
- Add New Contract Annual Mileage: Click this button to add a new annual mileage option to the system.
- Input Code: Enter a unique code for the contract annual mileage. This code will be used as a reference for this specific record.
- Input Value: Input the annual mileage value associated with the contract.
- Select Status: Select whether the contract annual mileage is Enabled or Disabled. Enabled records will be available for use, while disabled records will not.
- Managing Existing Records: Already added contract annual mileage records are displayed in a tabular format. A Search Bar is available at the top of each column to filter records based on search criteria. Use the ellipsis menu next to each record to Edit or Delete the respective contract annual mileage.

Contract Annual Mileage
Contract Term
The Contract Term screen allows users to configure and manage contract term options in the system. These configurations are saved in the backend and are available for selection as quotation parameters when creating or editing quotations. The screen includes columns for Code, Value, Finance Type(s) and Status, ensuring clear and precise management of contract terms.

Add New Contract Term
To manage Contract Terms, follow these steps:
- Add New Contract Term: Click this button to add a new contract term.
- Input Code: Enter a unique code for the contract term. This code will be used to identify the record and can serve as a reference point during the quotation process.
- Input Value: Input the value for the respective contract term. For example, a contract term value of 12 months can be associated with the code CT001, which will be available as a selection option when creating a quotation.
- Select Finance Type(s): Choose one or more finance types (e.g., Finance, Lease) from the drop-down list to associate with the contract term.
- Select Status: Choose whether the contract term is Enabled or Disabled. Enabled records will be active and selectable for use, while disabled records will no longer be available.
- Managing Existing Records: Contract term records that have already been added are displayed in a tabular format. A Search Bar is provided at the top of each column to filter records based on specific criteria. An ellipsis menu is available next to each record for users to Edit or Delete the respective contract term.

Contract Term
Fees
The Fees section allows users to configure and manage various fees within the system. This includes viewing, adding, editing and deleting fees, ensuring comprehensive fee management. Fees can represent any charge, such as processing fees or documentation fees, which are essential for different operations within the system. The window includes columns for Code, Fee Name and Status to help users organize and manage fee records efficiently.

Add New Fees
To manage Fees:
- Add New Fee: Click this button to Add New Fee. Note that fee codes must be unique and users cannot assign a fee code that overlaps with an existing code.
- Input Code: Enter the unique code assigned to the respective fee. This code is specific to each record and can be referenced as needed for system operations.
- Input Name: Enter the name of the fee. For example, fees can include processing fees, fees for non-tax payers or fees for tax payers.
- Select Status: Records with Status Enabled will be available for future use, while records with Status Disabled will no longer be accessible for future operations.
- Managing Existing Records: Already added fee records are displayed in a tabular form. A Search Bar is available at the top of each column to filter records based on search criteria. An ellipsis menu is provided on the right side of each record to Edit/Delete the respective fee.

Fees
Business Trading Age
The Business Trading Age section allows users to configure and manage different business trading age ranges in either months or years. This feature enables users to add, edit, view and delete trading age ranges, ensuring accurate management within the system. Business trading age ranges can represent various time periods, such as 1 to 3 years or 4 to 5 years, depending on requirements. The window includes columns for Age From, Age To and Status, providing a structured approach to managing business trading age records.
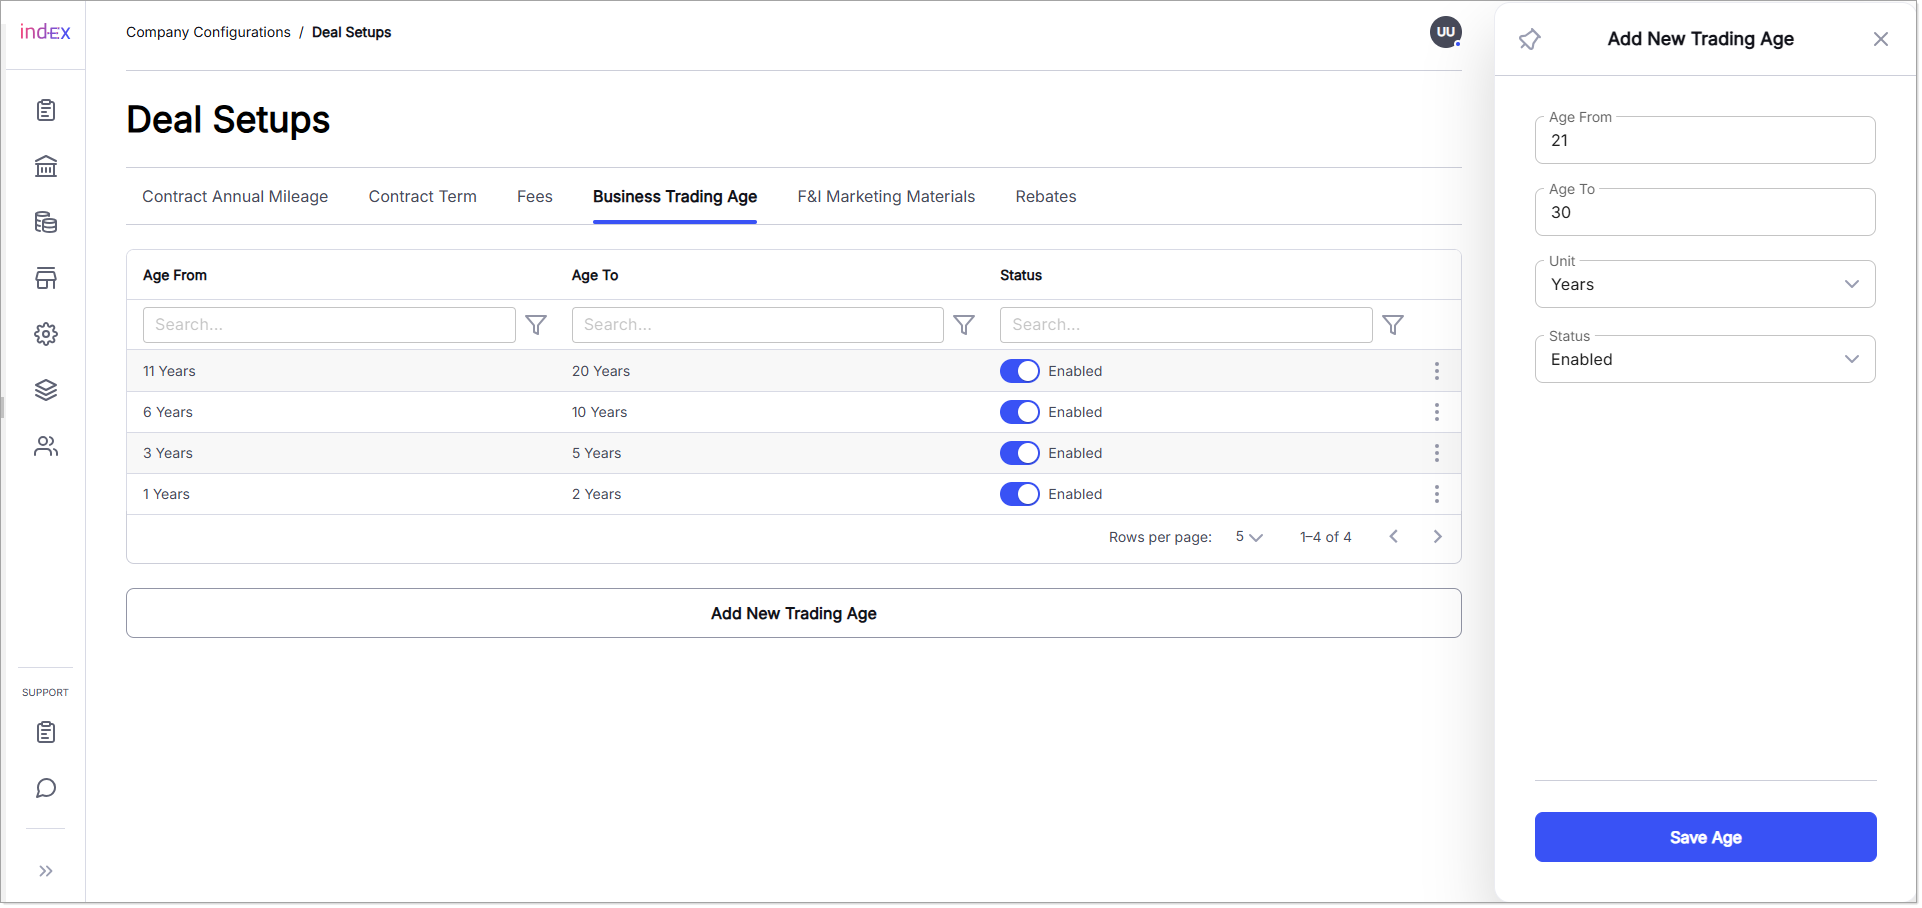
Add New Business Trading Age
To manage Business Trading Age, follow these steps:
- Add New Trading Age: Click this button to add a new business trading age.
- Input Age From: Enter the starting numeric value for the business trading age range (e.g., 1, 2, 3...).
- Input Age To: Enter the ending numeric value for the business trading age range (e.g., 1, 2, 3...).
- Select Unit: Choose either Months or Years from the dropdown list to specify the unit of time for the trading age range.
- Select Status: Choose whether the business trading age is Enabled or Disabled. Records with Enabled status will be active and available for selection, while Disabled records will be inactive and hidden from future use.
- Managing Existing Records: Business trading age records that have already been added are displayed in a tabular format. A Search Bar is available at the top of each column to filter records based on specific criteria. An ellipsis menu is located on the right side of each record, allowing users to Edit or Delete the respective business trading age.

Business Trading Age
F&I Marketing Materials
The F&I Marketing Materials tab allows users to configure and manage F&I marketing materials within the system, including adding, editing, viewing, and deleting records. These materials represent various F&I products, such as wear and tear protection, lease-end protection, and warranties. The interface includes columns for Provider, Provider Code, Product Type, Product Name, Description, Status, and associated media to help organize and manage records efficiently.

Add New F&I Marketing Materials
To manage F&I Marketing Materials:
- Add New Material: Click the button to add a new F&I Marketing Material.
- Input Provider Code: Enter the unique code assigned to the respective F&I product provider for identification purposes.
- Select Product Type: Choose a product type from the dropdown list associated with the selected provider.
- Select Product Name: Choose a product name from the dropdown list populated based on the selected product type.
- Input Description: Provide a description of the F&I product for marketing purposes.
- Upload Product Image: Drag and drop an image or browse to upload a visual representation of the F&I product.
- Input Video URL (Optional): Add a URL linking to a video showcasing the F&I product, if available.
- Input Brochure URL (Optional): Provide a URL linking to the brochure of the respective F&I product, if available.
- Select Status: Choose Enabled to make the record available for future use or Disabled to restrict access.
- Managing Existing Records: Existing records are displayed in a table format. Use the Search Bar at the top of each column to filter records. Edit or delete records via the ellipsis menu on the right of each entry.

F&I Marketing Materials
Rebates
The Rebates tab enables users to configure and manage details of various rebates within the system. This includes adding, editing, viewing, and deleting rebate records. Rebates represent specific deal-related incentives, such as manufacturer rebates, loyalty rebates, graduate rebates, first-time buyer rebates, and others. The interface provides columns for Rebate Name, Rebate Code, Rebate Amount, and Status to ensure effective organization and management of rebate data.

Add New Rebates
To manage rebates:
- Add New Rebate: Click the "Add New Rebate" button to create a new rebate record.
- Input Rebate Name: Enter the name of the rebate to identify it in the system.
- Input Rebate Description: Provide a brief description of the rebate.
- Input Rebate Requirements (Optional): Provide a brief description of the rebate requirements.
- Input Rebate Code: Enter a unique identifier for the rebate for reference and tracking.
- Rebate Amount: Specify the monetary value of the rebate.
- Select Required Documents (Optional): Configure one or more required documents that customers must provide to claim the rebate.
- Select Finance Type(s): Choose one or more finance types (e.g., Lease, Finance) from the drop-down list to associate with the rebate.
- Select Payment Term: Assign the rebate to applicable payment terms (e.g., 12, 24, or 36 months), which are populated based on contract terms defined in Deal Setups.
- Select Applicable States: Specify one or more states where the rebate is valid, using the drop-down list.
- Select Status: Mark the rebate as Enabled to make it active or Disabled to restrict its availability.
- Upload Product Image: Drag and drop or browse to upload an image representing the rebate visually.
- Managing Existing Records: View existing rebate records in a table format. Use the Search Bar at the top of each column to filter entries. Edit or delete records using the ellipsis menu on the right side of each entry.

Rebates
General Setups
The General Setups menu option is used to manage various setup details within the system, ensuring an organized and efficient configuration process. This section includes multiple tabs, each serving a distinct purpose: Integrations, Document Type, Decision Status, Stipulations, Other Costs, Templates, and Pre-Qualification. The Integrations tab records and manages third-party APIs and services that are integrated into the platform. The Document Type tab allows users to define the various document types required for business operations, ensuring all necessary documents are readily available. The Decision Status tab is used to configure status codes received from external credit decision systems and map them to internal order statuses. The Stipulations tab defines the conditions or requirements that must be met as part of a business agreement or decision-making process. The Other Costs tab records and manages different costs associated with the company's operations. The Templates tab allows users to create and manage pre-designed document formats for reports, letters, or other forms, streamlining document creation across the platform. The newly added Pre-Qualification tab enables users to define prequalification parameters based on Credit Score Range and Financed Amount. Together, these setups provide a comprehensive approach to managing key system configurations, enhancing operational efficiency and accuracy.

General Setups
Integrations
The Integrations tab is used to record and manage APIs and other services integrated into the Index platform. This section allows users to view and manage all external integrations, ensuring smooth interoperability with external systems. The screen displays Integration Types and Integration Providers, providing users with a clear and organized overview of all connected services. Efficient management of these integrations ensures that all APIs and services function optimally within the Index platform.

Add New Integrations
To manage integrations, follow these steps:
- Add New Integration: Click this button to add a new integration. Ensure that the integration does not overlap with any existing integration. a. Select Integration Type: Choose the type of integration from the drop-down list. Available options include Payment Processing, Customer Management, Inventory Management, F&I Products, Fraud Identification, Identity Verification, Location Services, Co-browsing, Purchase Insurance, Calculation & Taxation, E-Signatures, Pricing Program, Credit Decisioning, Contracting, Tagging, Credit Bureau, Proposal Submission, and Payoff Quotes. b. Select Route: Choose the appropriate route for the selected integration type from the drop-down list. c. Select Provider: Based on the selected route, choose the service provider from the drop-down list. d. Input Credentials: Enter the credentials provided by the chosen provider, such as the API Secret Key and API Version.
- Select Status: Records with Status Enabled will be available for use, while records with Status Disabled will not be accessible in the future.
- Managing Existing Integrations: Already added integration records are displayed in a tree hierarchy. A Search Bar is available to filter records based on search criteria. An ellipsis menu is located on the right side of each integration type to Add Provider. For each integration provider, another ellipsis menu allows users to Delete Provider.

Integrations
Document Type
The Document Type tab is used to define various document types required for business operations. Once defined, these document types are available in drop-down lists throughout the system where needed. This setup enables users to manage the Code, Description and Status of each document type. Examples of document types include proof of income, proof of employment, proof of residence, bank statements, driver's licenses, salary slips and more. Users can easily add new records, edit existing ones or delete unnecessary records, ensuring comprehensive management of all document types.

Add New Document Type
To manage document types, follow these steps:
- Add New Document Type: Click this button to add a new document type. Note that document type codes must be unique and users cannot assign a code that overlaps with an existing one.
- Input Code: Enter the unique code for the respective document type. This code will be specific to each document type and can be referenced as needed throughout the system.
- Input Description: Enter the name or details for the document type. For example, this could include salary slips, bank statements, driver's licenses, etc.
- Select Status: Records with Status Enabled will be available for use, while those with Status Disabled will not be available for future operations.
- Managing Existing Records: Already added document types are displayed in tabular form. A Search Bar is provided to filter records based on specific criteria. An ellipsis menu is available to the right of each record to Edit/Delete the respective document type.

Document Type
Decision Status
Decision Status is used to define decision status codes that will be received from the credit decision-making system and mapped to order statuses. Decision statuses can include approved, canceled, conditioned, draft, submitted and more. The screen includes columns for Response Code, Response Description, Order Status and Status, enabling users to manage and align decision statuses accurately. This ensures that the system reflects the correct order statuses based on credit decisions, facilitating smooth and efficient order processing.

Add New Decision Status
To manage decision statuses, follow these steps:
- Add New Decision Status: Click this button to add a new decision status. Note that response codes must be unique and users cannot assign a code that overlaps with an existing response code.
- Input Response Code: Enter the unique code assigned to the respective decision status. This code is specific to each record and can be referenced as needed.
- Input Response Description: Enter the description associated with the decision status.
- Select Order Status: Choose the corresponding order status such as approved, canceled, conditioned, draft, submitted, etc.
- Select Status: Records with Status Enabled will be available for future use, while records with Status Disabled will no longer be accessible.
- Managing Existing Records: Decision statuses that have already been added are displayed in tabular form. A Search Bar is available at the top of each column to filter records based on search criteria. An ellipsis menu is provided on the right side of each record to Edit/Delete the respective decision status.

Decision Status
Stipulations
Stipulations are specific conditions, requirements or terms that must be fulfilled as part of an agreement or credit decision-making process. These stipulations can vary depending on the nature of the transaction and are often used to ensure compliance with regulatory standards or reduce risk. In this system, the Stipulations section allows users to configure and manage these conditions effectively, ensuring they are clearly defined and easily tracked. The window includes columns for Stipulation Code, Stipulation Type, Parameter, Document Type, Assignee and Message Description, helping users to organize and monitor stipulations related to credit approval.

Add New Stipulations
To manage stipulations, follow these steps:
- Add New Stipulation: Click this button to add new stipulation details. Ensure that the stipulation code does not overlap with any existing code.
- Input Stipulation Code: Enter the unique code assigned to the stipulation. This code is specific to each record and can be referenced whenever needed.
- Select Stipulation Type: Choose the type of stipulation, such as financial, non-financial or general.
- Select Parameter: Based on the stipulation type, select a relevant parameter. For example, for financial stipulations, parameters might include financed amount, monthly payment or terms, while non-financial stipulations could involve upload document.
- Select Document Type: Choose the document type required when the parameter is set to upload document.
- Select Assignee: Indicate who is responsible for the stipulation, this could be the dealer, customer or both.
- Message Description: Provide a description related to the stipulation. For instance, for a financial stipulation with the parameter of monthly payment, you might write details about the required income information.
- Managing Existing Records: Stipulations that have already been added are displayed in a tabular format. A Search Bar at the top of each column allows you to filter records based on search criteria. An ellipsis menu is available on the right side of each record to Edit/Delete the respective stipulation.

Stipulations
Other Costs
The Other Cost tab is used to define various other costs required for business operations. These other costs can be selected as part of the Non-Asset Based Interest Rate chart and are available in drop-down lists throughout the system. Users can define the code, description and status for each other cost, ensuring these records are easily managed and accessed when needed. This setup guarantees accurate tracking of all other costs, supporting efficient business operations.

Add New Other Costs
To manage Other Costs, follow these steps:
- Add New Other Cost: Click this button to add a new other cost. Note that each other cost must have a unique code and overlapping codes are not allowed.
- Input Code: Enter the unique code assigned to the other cost. This code will be used for referencing the respective other cost throughout the system.
- Input Description: Enter the name or description of the other cost. For example, this could include various operational or overhead other costs.
- Select Status: Choose whether the other cost is Enabled or Disabled. Enabled other costs will be available for use, while disabled other costs will not.
- Managing Existing Records: Already added other costs are displayed in a tabular format. Use the Search Bar at the top of each column to filter other costs by specific criteria. The ellipsis menu next to each record allows you to Edit/Delete the respective other cost.

Other Costs
Templates
The Template tab is used to create new document templates, edit existing ones and configure predefined document templates within the system. Templates are essential for maintaining consistency in documents like reports, letters and contracts by using predefined formats that simplify the process of generating professional-looking documents.
Add/Edit a Template:
- Add New Template: Click this button to create a new document template.
 Add New Template
 - Select Storage Location and Format: Choose where the template will be stored and select the format from the drop-down list. Options include Word, SMS or Email.
- Input Name of Template: Enter the name of the new template.
- Disable Template: Click on the disable option if you wish to make the template inactive.
- Input Template Contents: Fill in the content for the template, including any placeholders or formatted text.
- Edit Template: Click this option to modify the content or settings of an existing template.

Add/Edit Templates
Add New Template Configuration
Templates serve as pre-designed layouts for documents, such as loan agreements, contracts or financial statements. This makes it easier to generate consistent and standardized documents for different operations. The template management screen includes columns for Code, Name, Event, Type and Status to help users keep track of and organize templates effectively.

Add New Templates Configuration
To configure existing templates, follow these steps:
- Add New Template Configuration: Click this button to configure a new template. Each template must have a unique code. You will need to provide the following details: Code, Name, Status, Applicable Financed Types, Dealer, State, Co-Applicant, Event, Type, Recipient and the Template itself.
- Input Code: Enter a unique identifier for the template. This code is used to reference the template configuration throughout the system.
- Input Name: Provide a name that accurately describes the template configuration for easy identification.
- Select Event: Choose the specific event or scenario in which the template will be applied, such as loan approval or contract generation.
- Select Type: Choose the format of the template, whether it’s an email, SMS or document.
- Select Status: Choose whether the template configuration is Enabled or Disabled. Enabled templates are available for use in the system, while disabled templates are inactive and cannot be used.
- Managing Existing Templates: Templates that have already been configured are displayed in a tabular format. Use the Search Bar at the top to filter templates based on different criteria. The ellipsis menu next to each record allows you to Edit or Delete the respective template.

Templates
Pre -Qualification
The Pre-Qualification tab is used to define pre-qualification parameters based on Credit Score Range and Financed Amount. This screen includes columns for Credit Score Range, Financed Amount, and Status, enabling users to effectively organize and manage pre-qualification parameters.

Add New Pre -Qualification
To manage Pre-Qualification, follow these steps:
- Add New Range: Click this button to add a new pre-qualification range.
- Select Credit Score Range: Choose a credit score range from the drop-down list. This list is populated with credit score ranges defined under the Credit Score tab in Program Setups.
- Input Financed Amount: Enter the financed amount applicable to the selected credit score range for pre-qualification.
- Select Status: Choose whether the respective pre-qualification range is Enabled or Disabled. Enabled ranges will be available for use, while disabled ranges will not be accessible.
- Manage Existing Records: Pre-qualification ranges that have already been added are displayed in a table format. Use the Search Bar at the top of each column to filter ranges by specific criteria. The ellipsis menu next to each record allows you to Edit or Delete the respective record.

Pre -Qualification
Program Setups
The Program Setups allow users to configure a wide range of asset and program-related details essential for system operations. It includes the following tabs: Asset Catalogue, which manages the make, model and trim details of various assets; Asset Condition, where users can define conditions like new, used or average; Asset Usage, which records the intended use of assets, such as commercial or non-commercial; Annual Mileage, used to define mileage ranges; Term, which helps configure term ranges for loans; Credit Score, to set up credit score parameters; Financed Amount, for configuring ranges of financed amounts; and Business Unit, used to define and manage business units. This comprehensive setup ensures accurate configuration of asset-related data, which is crucial for seamless operations.

Program Setups
Asset Catalogue
The Asset Catalogue section is designed to record and manage the essential details of assets, including Make, Model and Trim, along with their associated Description, Code and Status. This feature ensures that all asset information is organized and accessible, facilitating effective asset tracking and maintenance throughout the system.

Add New Asset Make
To manage asset details in the Asset Catalogue, follow these steps:
- Add New Make: Use this option to add a new make for an asset. The system ensures that no duplicate make can be added.
- Input Make: Enter the name of the make for the asset.
- Input Description: Provide a description for the respective make, model or trim of the asset to give additional clarity.
- Input Code: Assign a unique code to the asset’s make, model or trim. This code acts as a reference for future use and must be unique for each record.
- Select Status: Choose whether the record is Enabled or Disabled. Enabled records will be active and available for use, while disabled records will no longer be accessible in future operations.
- Managing Existing Records: Added records are displayed in a hierarchical tree structure, representing the Make, Model and Trim of each asset. Each entry has its own row, allowing users to independently View, Edit, Delete or Add new records. Users can filter records using the Search Bar available at the top of each column.
 Asset Catalogue
 - Add New Make/Model/Trim: Use these options to add new records for each specific category. While adding/editing a Trim user can also Upload Image for the same.
- Download Template/Upload File: Users can download a pre-defined template or upload files to bulk upload asset catalogue records.

Asset Catalogue Download Template/Upload File
Asset Condition
The Asset Condition tab helps users record and manage the condition of various assets, such as excellent, average, poor, new or used. The interface includes fields for Code, Description and Status, ensuring that asset conditions are clearly documented and easy to manage.

Add New Asset Condition To manage asset conditions, follow these steps:
- Add New Asset Condition: Click this button to add a new asset condition.
- Input Code: Enter a unique code assigned to the asset condition. Each code is specific to the record and can be referenced as needed.
- Input Description: Provide a description of the asset condition, such as excellent, average, poor, new or used.
- Select Status: Choose whether the asset condition is Enabled or Disabled. Enabled conditions will be available for use, while disabled ones will no longer be accessible.
- Managing Existing Records: Already added asset conditions are displayed in a tabular format. Use the Search Bar at the top to filter records based on search criteria. The ellipsis menu on the right side of each record allows users to Edit or Delete the respective asset condition.

Asset Condition
Asset Usage
The Asset Usage section allows users to record and manage details about how assets are utilized, such as for commercial or non-commercial purposes. The interface includes columns for Code, Description and Status, ensuring that asset usages are accurately documented and tracked. This feature helps users maintain clarity on the intended use of each asset, facilitating efficient management and reporting.

Add New Asset Usage
To manage asset usage, follow these steps:
- Add New Asset Usage: Click this button to create a new asset usage record.
- Input Code: Enter a unique code for the asset usage. Each code is distinct for each record and can be used for reference whenever required.
- Input Description: Provide a description of the asset usage, such as commercial or non-commercial purposes.
- Select Status: Choose whether the asset usage is Enabled or Disabled. Enabled usages will be available for further use, while disabled ones will no longer be accessible.
- Managing Existing Records: Existing asset usage records are displayed in a table format. Use the Search Bar at the top to filter records based on search criteria. An ellipsis menu next to each record allows users to Edit or Delete the respective asset usage.

Asset Usage
Annual Mileage
The Annual Mileage section is used to define mileage ranges that can be applied to various business rules, such as interest rate calculations. These ranges, such as 01 km/mile to 999 km/mile or 1000 km/mile to 9999 km/mile, are vital for maintaining accurate records in the system. The window includes columns for Annual Mileage From, Annual Mileage To and Status, allowing for clear documentation and easy reference.

Add New Annual Mileage
To manage annual mileage ranges, follow these steps:
- Add New Annual Mileage: Click this button to create a new mileage range. Ensure that no overlapping range is defined.
- Input Annual Mileage From: Enter the starting point of the mileage range (e.g., 01 km/mile).
- Input Annual Mileage To: Enter the end point of the mileage range (e.g., 999 km/mile).
- Select Option Status: Choose between Enabled or Disabled for the mileage range. Enabled records will be available for use, while disabled records will be inactive.
- Managing Existing Records: Already added annual mileage records are displayed in a tabular form. Use the Search Bar at the top to filter the records. An ellipsis menu is available on the right side of each record to Edit/Delete the respective annual mileage range.

Annual Mileage
Term
The Term tab is used to define ranges for terms, such as 1 month to 12 months and is an important factor when setting up charts in Index. The window provides columns for Term From, Term To and Status, helping users manage term ranges effectively.

Add New Term.
To manage term ranges, follow these steps:
- Add New Term is used to add a new term range. Note that users cannot define a term range that overlaps with an existing range.
- Input Term From: Enter the starting point of the term range.
- Input Term To: Enter the ending point of the term range.
- Select Status: Choose Enabled for active terms or Disabled for inactive ones. Only enabled terms will be available for use in the future.
- Managing Existing Records: Existing term records are displayed in tabular form. You can use the search bar at the top of each column to filter records based on specific criteria. An ellipsis menu is provided next to each record, allowing you to Edit/Delete the respective term range.

Term
Credit Score
The Credit Score tab is used to define and manage credit score ranges, which are essential for use in charts and deal creation in the Deal Builder feature. Users can define different credit ratings, such as poor, fair, good, very good and exceptional, by specifying credit score ranges. The window includes columns for Description, Credit Score Range and Status, ensuring accurate setup and organization of credit score data.

Add New Credit Score
To manage credit score ranges, follow these steps:
- Add New Credit Score is used to add a new credit score range. Note that users cannot define a range that overlaps with an existing credit score range.
- Input Credit Score From: Enter the starting point of the credit score range.
- Input Credit Score To: Enter the ending point of the credit score range.
- Input Description: Provide a name or description for the credit score range, such as poor, fair, good, very good or exceptional, based on the defined range.
- Select Status: Choose Enabled for active credit score ranges or Disabled for inactive ones. Only enabled records will be available for future use.
- Managing Existing Records: Already added credit score records are displayed in a tabular form. Use the Search Bar at the top of each column to filter records based on specific criteria. An ellipsis menu is provided on the right side of each record, allowing you to Edit/Delete the respective credit score range.

Credit Score
Financed Amount
The Financed Amount section is used to configure ranges of financed amounts that serve as business criteria in various charts. For instance, financed amount ranges can be set from 1 to 500, from 501 to 1000 and so on. The window includes columns for Financed Amount From, Financed Amount To and Status, ensuring that financed amounts are properly set up and managed for evaluation within the system.

Add New Financed Amount
To manage financed amounts, follow these steps:
- Add New Financed Amount Range: Use this option to add a new financed amount range.
- Input Financed Amount From: Enter the starting value for the financed amount range.
- Input Financed Amount To: Enter the ending value for the financed amount range.
- Select Option Status: Choose whether the record is Enabled or Disabled. Enabled records will be available for future use, while disabled records will not.
- Managing Existing Records: Financed amount records that have already been added are displayed in a tabular form. A Search Bar is provided at the top of each column to filter records based on search criteria. An ellipsis menu is available on the right side of each record to Edit/Delete the respective financed amount range.

Financed Amount
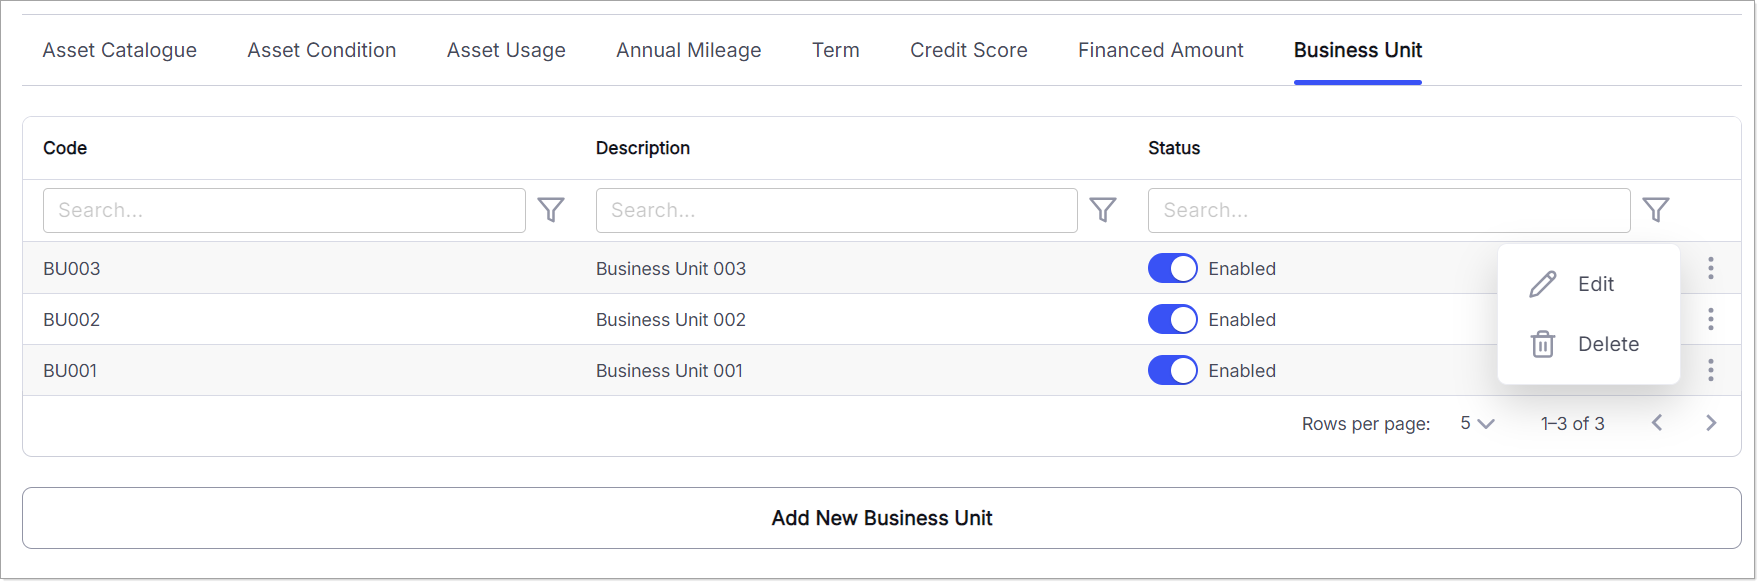
Business Unit
The Business Unit section allows users to define and manage business units that are available as optional multi-select business criteria in interest rate charts. Once defined, these business units appear in drop-down lists throughout the system wherever applicable. This setup helps users record and manage the Code, Description and Status of each business unit, ensuring flexible and comprehensive control over business unit settings.

Add New Business Unit
To manage business units, follow these steps:
- Add New Business Unit: Click this option to add a new business unit. It is important to ensure that the Code is unique and does not overlap with any existing business unit code.
- Input Code: Enter a unique code that will be assigned to the business unit. This code will be used as a reference for the respective business unit where needed.
- Input Description: Provide a descriptive name for the business unit, such as "Unit 1" or "Unit 2."
- Select Option Status: Choose the status of the business unit. Records with Status Enabled will be available for future use, while records with Status Disabled will no longer be available for future operations.
- Managing Existing Records: All previously added business unit records are displayed in tabular form. A Search Bar is available at the top of each column to filter the records based on search criteria. An ellipsis menu is provided on the right side of each record, allowing users to Edit/Delete the respective business unit.
Business Unit