Pricing Configurations
The Pricing Configurations menu includes both Programs and Charts options. The Programs section allows users to manage structured financial offerings, rules and plans associated, including financial products, incentives, promotional offers and specific terms for borrowers. The Charts section is used to define and manage various financial and performance-related criteria, which are applied to different lending programs and operations. Users can create, view, edit and delete charts to set business and calculation parameters.

Pricing Configurations
Programs
A program refers to a structured set of offerings, rules or plans associated with lenders, including financial products, incentives, promotional offers and specific terms and conditions provided to borrowers. Programs play a critical role in streamlining lending operations by defining clear criteria and benefits for different lending scenarios. Within the system, users can add new programs or edit existing ones. While creating or managing a program, users must input General Information, Financial Parameters, Subsidy, Commission, End Of Term, Dealer's Details, Asset Details and Associate Charts to ensure a comprehensive and precise configuration tailored to their lending requirements. The Programs screen includes key columns such as Product Name, Product ID, Finance Type, Validity, State and Status to help users organize and track program details efficiently.

Programs
Add New Program
- To add a new Program, click on the Add New Program button.
Add New Program
- A window will open, presenting various tabs, including General, Financial Parameters, Subsidy, Commission, End Of Term, Dealers, Assets and Chart Association. Each tab allows users to input detailed information and configure specific aspects of the program for comprehensive management.

Input Details of New Program
General
The General tab in the program setup includes essential fields like Program Name, Program ID, Validity (valid from and to dates), Finance Type and Lender Name. These fields ensure that each program is uniquely identified and its active period is clearly defined. This allows for accurate configuration of the program’s operational parameters.

Programs General
To manage the General tab of the program setup, follow these steps:
- Input Program Name: Enter the unique name for the program. For example, you can name a program Program 001. Each program name must be unique to avoid duplication.
- Input Program ID: Assign a unique identification number to the program. This ID will serve as a reference for the program across the system whenever needed.
- Input Date From and Input Date To: Define the program’s validity period. The program will remain active within the specified date range. If no Date To is provided, the program stays active indefinitely. Once the system date passes the Date To, the program will expire but remain available for reference.
- Select Option Finance Type: Choose the finance type from the dropdown. Options include Lease or Finance, depending on the nature of the program.
- Select Option Lender Name: Choose a lender from the dropdown list of enabled lenders, which are configured under the Lender Profile section of Lender Configurations.
- Click Save Changes to save the program details and follow any additional system prompts to complete the process.
Financial Parameters
The Financial Parameters tab on the Program window is used to define and manage the financial criteria and settings associated with a specific program. Financial parameters include Rental Frequency, Interest Type, Base Rate Source, Interest Rate Override, Rental Calculation Method, Rental Mode, Rate Conversion Method, RV/Balloon Payment Applicability, RV/Balloon Payment Type, RV/Balloon Payment Calculation Method and RV/Balloon Payment Override option for a program ensuring accurate and comprehensive financial configuration for lending operations.

Programs Financial Parameters To manage the Financial Parameters tab in the program setup, follow these steps:
- Select Option Rental Frequency: Choose the frequency for repayment installments from options like Monthly, Quarterly, Semi-Annual, Annual, Weekly or Fortnightly. Users can select one or multiple frequencies based on the program's needs.
- Select Option Interest Type: Choose the type of interest associated with the program. For example, selecting Fixed means the interest rate will remain constant throughout the loan term.
- Select Option Base Rate Source (Optional): Choose the source of the base interest rate. Available options include rates like LIBOR, SOFR, SONIA and EURIBOR.
- Select Option Interest Rate Override: Determine whether the interest rate can be overridden for the program by selecting Yes or No.
- Select Option Rental Calculation Method: Choose the method for rental calculation from options like Annuity, Flat, Flat Plus,Equal Principal, etc., to ensure accurate rental computations for the program.
- Select Option Rental Mode: Choose from Advance or Arrear.
- Advance means the first rental (installment) is paid at the time of down payment.
- Arrear means the first rental is paid when the first installment is due.
- Select Option Margin Rate Conversion Method: Choose whether the rate conversion method is Simple or Compounded based on how you want the margin rate to be calculated.
- Select Option RV/Balloon Applicable: Indicate whether the residual value (RV) or balloon payment is applicable to the program by selecting Yes or No.
- Select Option RV/Balloon Type: Choose between RV or Balloon as the type of final payment associated with the program. This drop down will on;y be enabled when RV/Balloon is Applicable.
- Select Option RV/Balloon Calculation Method: Choose the calculation method for RV or balloon payments from options like Asset Cost Including Tax or Asset Cost Excluding Tax. This drop down will on;y be enabled when RV/Balloon is Applicable.
- Select Option RV/Balloon Override: Choose whether RV or balloon payments can be overridden by selecting Yes or No. This drop down will on;y be enabled when RV/Balloon is Applicable.
- Click Save Changes and follow any system prompts to save the financial parameters for the program.
Subsidy
Subsidy tab is used to configure and manage any subsidies associated with a specific program. This includes details about financial assistance or incentives provided to reduce the cost for borrowers, such as government grants, manufacturer discounts or other types of financial support. This tab includes options to define Calculation Methods, Amortization Method and Tax Amortization for respective subsidy through corresponding drop down lists. Additionally, users can specify whether the subsidy can be overridden or not. These settings ensure that subsidies are accurately applied and managed, providing financial assistance or incentives that reduce costs for borrowers in alignment with program guidelines.

Programs Subsidy
To configure and manage subsidies for a program, follow these steps in the Subsidy tab:
- Select Option Calculation Method: Choose the method used to calculate the subsidy. Available options include Target Base Rate, Percentage from Dealer, Percentage from Manufacturer or Adjusted Customer Rate. This ensures the correct method is applied based on the program's structure.
- Select Option Amortization Method: Choose the amortization method for the subsidy from options such as Annuity – Actual Number of Days, Straight Line, Straight Line Pro Rata or Straight Line for Actual Number of Days.
- Select Option Tax Amortization: Choose whether to include Tax Amortization when configuring the subsidy for the program.
- Select Option Subsidy Override: Decide if the subsidy can be overridden by selecting Yes or No. If enabled, this allows adjustments to the subsidy for specific scenarios.
- Chart Association: The Chart Association for the subsidy will remain disabled until all mandatory fields in the Subsidy tab are completed. Only subsidies with a selected calculation method will be available for chart association. If no method is chosen, the system will prompt the user to configure the Calculation Method before associating the subsidy with the chart.
- Click Save Changes and follow system prompts to save the subsidy configuration for the program.
Commission
Commission tab is used to configure and manage any commissions associated with a specific program. Users can define the commission structure, including the commission type, amortization method and specify whether the commission can be overridden or not. This tab ensures that all commission-related details are accurately recorded and maintained within the system.

Programs Commission
To configure and manage commissions for a program, follow these steps in the Commission tab:
- Select Option Commission Type: Choose the type of commission that will be applied to the program. This determines how the commission will be calculated.
- Select Option Amortization Method: Choose the amortization method for the commission from options such as Annuity – Actual Number of Days, Straight Line, Straight Line Pro Rata or Straight Line for Actual Number of Days.
- Select Option Commission Override: Decide if the commission can be overridden by selecting Yes or No. If enabled, this allows adjustments to the commission for specific circumstances.
- Chart Association: The Chart Association for the commission will remain disabled until all mandatory fields in the Commission tab are completed. The system will display a tooltip prompting the user to complete the commission configurations before associating a commission chart with the program.
- Click Save Changes and follow the system's prompts to save the commission configuration for the program.
End of Term
End of Term tab is used to configure and manage options and conditions that apply at the end of a financing term. This tab allows users to define end-of-term scenarios, such as purchase option applicable or not. By setting these parameters, users can ensure that all end of term details are clearly outlined and managed within the system. End of term details defined here for a program are available as business criteria in the charts.

Programs End of Term
To configure and manage end-of-term options for a program, follow these steps:
- Select Option Purchase Option Applicable: Choose whether the purchase option is applicable by selecting Yes or No from the dropdown. This determines if the borrower has the option to purchase the asset at the end of the financing term.
- Select Option Purchase Option Type: If Yes is selected for the purchase option, the Purchase Option Type dropdown becomes enabled. Select the appropriate option that defines the type of purchase arrangement.
- Click Save Changes and follow the system's instructions to save the record.
Dealers
Dealers tab manages and associates dealers with a specific program. This tab allows users to select and link dealers who are authorized to offer the program, ensuring that only eligible dealers can access and utilize the program's features and benefits. By configuring the Dealers tab, users can maintain control over which dealers participate in each program, enhancing the program's management and implementation. Only associated dealers are able to access respective program.

Programs Dealers
- A search bar is available on top of each column to filter the record on basis of search criteria.
- Dealer Name refers to the name of dealer.
- Dealer ID denotes unique identification number assigned to respective dealer. This dealer ID is unique for each record and can be used as a reference for respective record where and when required.
- User can Check Mark √ all dealers or individual dealer to associate them with program.
- Click on Save Changes and follow system's instructions to save the record.
Assets
Assets tab is used to manage and associate specific assets with a particular program. This tab allows users to select and link assets that are eligible for the program, ensuring that only designated assets can be included under the program's terms and benefits. User can only associate the already configured assets with program. On Assets tab users can control which assets are part of the program, facilitating accurate and efficient program management and implementation. Screen displays the list of assets which are already configured in system under Make/Model/Trim details, Description and Code columns.

Programs Assets
- A search bar is available on top of each column to filter the record on basis of search criteria.
- Make/Model/Trim of an asset are represented in tree form. Each record has a separate row so that user can associate respective record independently.
- Description ascertains the description of respective make/mode/trim of an asset.
- Code denotes unique code assigned to respective make/model/trim of an asset. This code is unique for each record and can be used as a reference for respective record where and when required.
- User can Check Mark √ all assets or individual asset to associate them with program.
- Click on Save Changes and follow system's instructions to save the record.
Charts Association
Charts Association is used to associate various charts with a specific program. This tab allows users to link already defined charts in system e.g. charts for base rate, margin rate, RV/balloon, down payment, subsidy and commission to the program, ensuring that the correct calculation methods and parameters are applied. By configuring the Charts Association tab, users can customize the program's financial calculations and benefits, making sure they align with the program's objectives and rules.

Programs Charts Association
To configure and manage charts, follow these steps:
- Use the available dropdown lists to select and associate the relevant charts with the program.
- Attaching at least one Interest Rate chart is mandatory for the program to be published. Users also have the option to attach both types of interest rate charts.
- Click Save Changes and follow the system's instructions to save the record.
Edit Existing Program
Existing programs are displayed in a tabular format for easy access and management. Users can utilize the Search Bar to filter and locate specific programs. The ellipsis menu next to each program provides options to View, Edit or Save as a new program. Key columns on the screen include Program Name, Program ID, Finance Type, Validity, State (draft, ready to publish or published statuses) and Status (indicating whether the program is Enabled or Disabled). This layout helps users efficiently organize and manage program details.
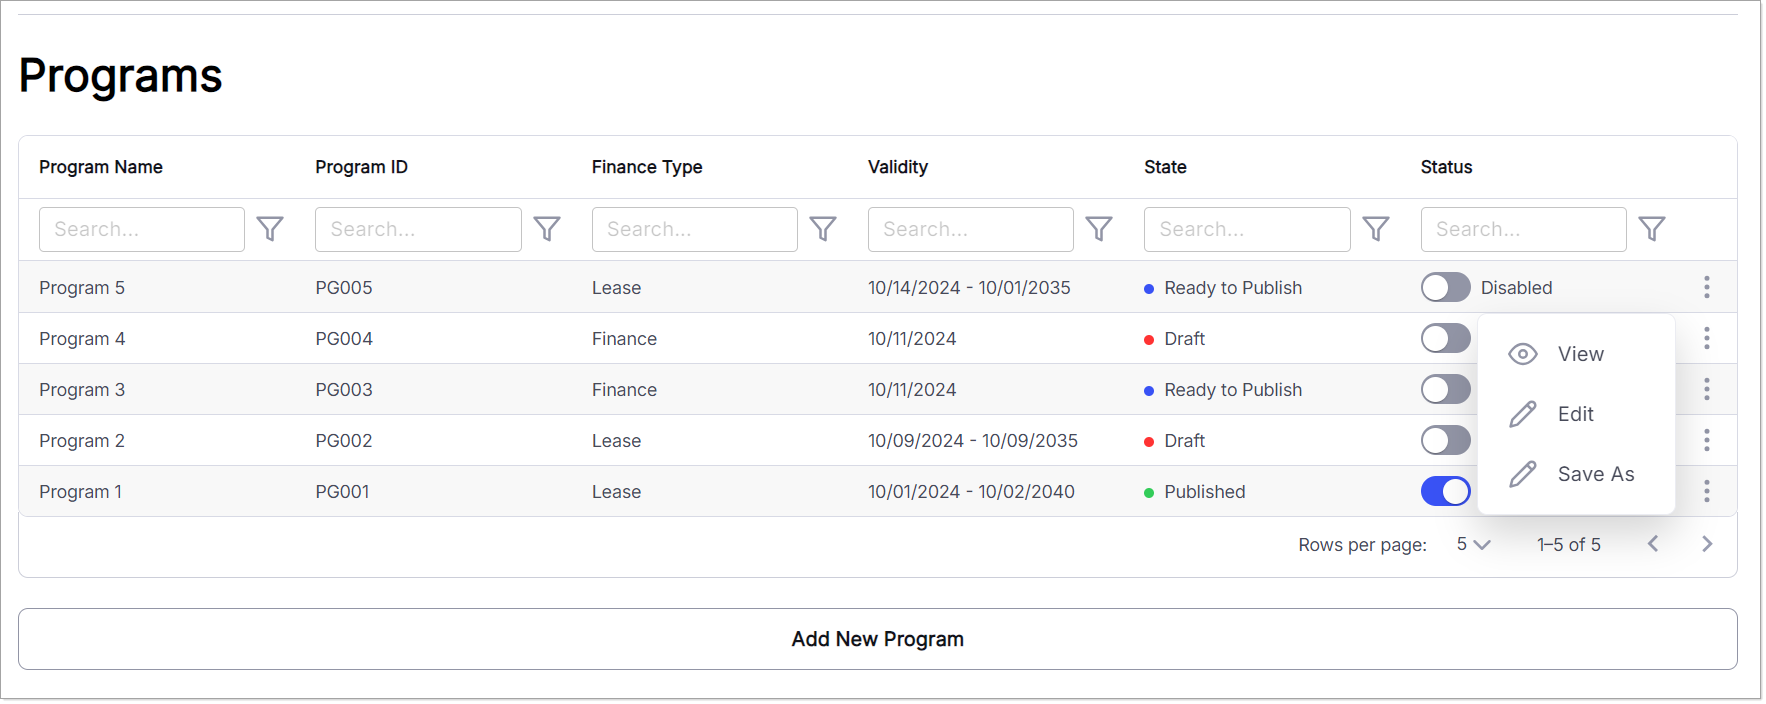
Programs
- A search bar is available on top of each column to filter the record on basis of search criteria.
- Product Name refers to the name given to to respective program. Product name is unique for each program.
- Product ID denotes unique identification number assigned to respective program. This product ID is unique for each record and can be used as a reference for respective record where and when required.
- Finance Type refers to the finance type i.e. either lease or finance associated with respective program.
- Validity tells us about the last valid date for respective program.
- State refers to the current state of program e.g. a program can be in draft state, ready to publish or published.
- Records with Status Enabled will be available for further use whereas record with Status Disabled will not be available for further use in future. Status of a record can only be changed when it is in published state.
Charts
The Charts menu option is used to manage various financial and performance-related criteria, referred to as charts, within the system. This menu allows users to create, view, edit and delete charts that define business and calculation criteria for different lending programs and operations. By configuring charts, users can set parameters such as interest rates, subsidies, fees and other financial metrics. For example, an interest rate chart can be defined based on factors such as asset type, term duration, credit score or margin. Similarly, charts can also be configured for residual value/balloon payments and other metrics. The system allows multiple criteria to be combined in a single chart, ensuring comprehensive financial calculations are accurately represented across the platform, providing a structured and consistent approach to managing financial data and business rules.

Charts
Base Rate Chart
The Base Rate Chart is essential for setting the foundational interest rates applied to lending products within the system. It determines the initial rate before any adjustments or specific criteria like tenures and dates are applied. Users can define multiple base rate charts based on various tenures and effective dates, ensuring precise and flexible interest rate configurations for financial products.

Base Rate Charts Add New Record
To configure and manage base rate charts, follow these steps:
-
Add New Base Rate: Use this option to create a new base rate chart. Ensure that the new chart does not overlap with any existing charts.
-
Select Option Base Rate Source (Optional): Choose the source of the base interest rate. Available sources include options such as LIBOR, SOFR, SONIA and EURIBOR.
-
Select Option Tenure: This refers to the duration for which the base rate is defined. Tenure options include 7 days, 15 days, 30 days, 60 days and 90 days.
-
Input Base Rate: This field allows the user to enter the base rate value (up to four decimal points).
-
Effective Date: Specify the date from which the respective base rate chart becomes effective.
-
Managing Existing Records: All base rate charts are displayed in a tabular format. Users can filter records using the Search Bar and make changes through the ellipsis menu, provided the effective date is in the future. The ellipsis menu allows users to Edit or Delete the entry, but:
- If the Effective Date has already passed, the chart criteria cannot be edited.
- A base rate chart cannot be deleted if it is linked to a financial product or if its effective date is in the past.
-
Validations:
- No Overlapping Criteria: Charts cannot have overlapping effective dates or criteria.
- Deletion Restrictions: A chart cannot be deleted if it is linked to a financial product (FP).
- Locked Criteria: Criteria associated with past dates or locked configurations cannot be edited.
-
Example:
- If a user creates a record with an effective date of 01-Jan-2025, any new record must have a future effective date (e.g., 02-Jan-2025). Upon reaching the new effective date, the previous record will automatically be disabled and the new rate will take effect.

Base Rate Chart
Margin Rate
The Margin Rate Chart is used to define the additional percentage or amount added to the base rate, which helps in determining the final interest rate for loans or financial products. The margin is typically based on various factors such as credit score, loan term and other risk-based criteria. This chart allows users to configure multiple margin rate charts with unique names, enabling the system to apply specific margin values to lending operations based on predefined criteria. These criteria include asset details, terms and financial metrics, ensuring accuracy in financial calculations and consistency across the system.

Margin Rate Charts Add New Record
To configure and manage margin rate charts, follow these steps:
- Add New Chart: Click the Add New Chart button to input chart details. Each chart must have a unique name and must not overlap with an existing chart. Users are required to input a chart name, select its status, define business criteria and specify output parameters.
- Input Chart Name: Enter a unique name for the margin rate chart. This name will serve as a reference for the respective record whenever needed.
- Select Option Status: Choose whether the chart will be Enabled or Disabled. Enabled charts will be available for further use, while disabled charts will not be accessible for future operations.
- Select Options Asset Make/Model/Trim: Choose the asset's make, model and trim from the drop-down lists populated with records from the Asset Catalogue under General Setups in Company Configurations.
- Select Option Manufacturer: Select the manufacturer of the respective asset.
- Select Option Purchase Option: Indicate whether a purchase option is applicable at the end of the term.
- Select Option Asset Condition: Define the condition of the asset. The drop-down list is populated from records in the Asset Condition tab under General Setups.
- Select Option Asset Usage: Specify how the asset will be used, such as for commercial or non-commercial purposes. This is populated from the Asset Usage tab under General Setups.
- Select Option Terms: Define the range of terms for the chart, such as 1-12 months or 13-24 months. These options come from the Term tab under Program Setups.
- Select Option Credit Score: Indicate the customer’s credit score, which can range from excellent to poor. The options come from the Credit Score tab under Program Setups.
- Select Option Finance Amount Range: Specify the financed amount range, pulled from the Finance Amount tab under Program Setups.
- Select Option Business Unit: Choose the business unit associated with the criteria, populated from the Business Unit tab under Program Setups.
- Select Option for Finance Type(s): Select whether the chart applies to Finance, Lease or both.
- Select Option Customer Type: Define the customer type associated with the chart.
- Select Option Asset Category: Specify the asset category.
- Select Option Asset Type: Choose the type of asset being financed.
- Select Option Product Type: Indicate the product type involved in the chart.
- Select Option Business Trading Age: Define the business’s trading age, populated from the Business Trading Age tab under Order Setups.
- Select Option Down Payment Range: Specify the down payment range, such as 10%-15% or 16%-20%.
- Select Option Margin Type: Choose the type of margin, which can be a percentage rate.
- Select Option Rate Type: Define whether the rate is Net Yield, APR, Flat or Money Factor.
- Margin: Enter the specific margin rate. You can also define a minimum and maximum margin to establish a range for the margin rate.
- Margin Range: Specify the minimum and maximum margin for the chart.
- Search Bar: Use the search bar on top of each column to filter records based on criteria such as asset, terms or credit score.
- Ellipsis Menu for Chart: An ellipsis menu on the right side of each chart allows users to Rename, Delete or Add Criteria. When renaming, only the chart name and status are editable. In case of deletion, a validation ensures that the chart can only be deleted if it is not attached to a financial product (FP). When adding a new criterion, users can select multiple criteria and upon saving, these will be included in the chart.

Margin Rate Charts
- Ellipsis Menu for Criteria: An ellipsis menu on the right side of each criterion allows users to Edit or Delete it. Users can modify existing criteria, but deletion is only possible if the criterion is not associated with an FP.
- Validations:
- No Overlapping Criteria: Charts cannot have overlapping effective dates or criteria.
- Deletion Restrictions: A chart cannot be deleted if it is linked to a financial product (FP).
- Locked Criteria: Criteria associated with past dates or locked configurations cannot be edited.

Margin Rate Charts Edit Delete Criteria
RV/Balloon
The RV/Balloon chart defines the residual value or balloon payment amounts for assets at the end of a loan term. This chart helps estimate the asset's value at the end of the financing period, impacting the loan structure and repayment schedule. By configuring RV/Balloon charts, users can better manage and predict asset values, ensuring accurate financial planning and offering flexible financing options. Users can create multiple RV/Balloon charts, each with a unique name and associated business criteria.

RV/Balloon Charts Add New Record
To manage RV/Balloon charts, follow these steps:
- Add New Chart: Click Add New Chart to define new RV/Balloon chart details. The chart name must be unique and overlapping charts are not allowed. Users must input a chart name, select status and define business criteria and output parameters.
- Input Chart Name: Enter the unique name for the RV/Balloon chart. This name will serve as a reference for the chart when needed.
- Select Option Status: Set the chart as Enabled or Disabled. Enabled charts are available for use, while disabled charts will be hidden from future operations.
- Select Options Asset Make/Model/Trim: Choose the asset's make, model and trim. These options are populated from the Asset Catalogue in General Setups under Company Configurations.
- Select Option Asset Condition: Define the condition of the asset from options populated in the Asset Condition tab in General Setups.
- Select Option for Finance Type(s): Define whether the chart applies to Finance, Lease or both.
- Select Option Customer Type: Choose the customer type related to the chart.
- Select Option Asset Category: Specify the asset category.
- Select Option Asset Type: Choose the asset type.
- Select Option Asset Type: Choose the type of asset being financed.
- Select Option Asset Usage: Specify the asset's usage, such as commercial or non-commercial purposes. Options are drawn from the Asset Usage tab in General Setups.
- Select Option RV Guarenteed select options are Yes and No.
- Select Option Terms: Define the term range for the chart, e.g., 1-12 months, 13-24 months, etc. These are set up in the Term tab under Program Setups.
- Select Option Annual Mileage: Define the annual mileage range for the chart, e.g., 01-999 miles, 1000-9999 miles, etc. These are set up in the Annual Mileage tab under Program Setups.
- Select Option Purchase Option: Define whether a purchase option is applicable at the end of the term.
- Select Option Finance Amount Range: Choose the financed amount range, populated from the Finance Amount tab under Program Setups.
- Select Option for RV/Ballon Type: refers to the type of residual value e.g. residual value type can be percentage which means residual value or balloon payment will be calculated on the basis of percentage.
- Default Value refers to the percentage rate of residual value/balloon payment. User can also define Minimum Value and Maximum Value in order to define range for a rv/balloon payment while defining a chart/criteria.
- Ellipsis Menu for Chart: An ellipsis menu on the right of each chart provides options to Rename, Delete or Add Criteria. For renaming, only the chart name and status can be changed. Charts can only be deleted if not attached to a financial product (FP). New criteria can be added and upon saving, the chart will include the updated criteria.

RV/Balloon Charts
- Ellipsis Menu for Criteria: Each criterion has an ellipsis menu for Edit or Delete. Users can modify criteria except for those attached to FPs or related to past dates.
- Validations:
- No Overlapping Criteria: Charts cannot have overlapping effective dates or criteria.
- Deletion Restrictions: A chart cannot be deleted if it is linked to a financial product (FP).
- Locked Criteria: Criteria associated with past dates or locked configurations cannot be edited.

RV/Balloon Charts Edit Delete Criteria
Down Payment
The Down Payment chart is used to configure the required down payment amounts for various financing scenarios. This chart allows users to define the minimum and maximum down payment percentages or amounts that borrowers need to provide upfront when financing an asset. By setting up Down Payment charts, users ensure that financing terms are aligned with the lender’s policies and risk management strategies. Users can configure multiple Down Payment charts, each requiring a unique name. The chart configuration requires input for Chart Name, Chart Status, Business Criteria and Output Parameters.

Down Payment Charts Add New Record
To manage Down Payment charts, follow these steps:
- Add New Chart: Click the Add New Chart button to define the details of a new Down Payment chart. Each chart must have a unique name and overlapping charts are not allowed. Input the chart name, select its status, define business criteria and specify output parameters.
- Input Chart Name: Enter a unique name for the Down Payment chart. This will serve as a reference for the chart when needed.
- Select Option Status: Choose whether the chart will be Enabled or Disabled. Enabled charts will be accessible for further use, while disabled charts will not be available for future operations.
- Select Options Asset Make/Model/Trim: Choose the asset’s make, model and trim from the drop-down lists. These options are populated from the Asset Catalogue in General Setups under Company Configurations.
- Select Option Asset Condition: Define the condition of the asset. The available options are populated from the Asset Condition tab in General Setups.
- Select Option Terms: Define the term range for the chart, such as 1-12 months or 13-24 months. These options are set in the Term tab under Program Setups.
- Select Option Credit Score: Indicate the customer’s credit score, ranging from excellent to poor. The available options are populated from the Credit Score tab under Program Setups.
- Select Option Finance Amount Range: Choose the finance amount range, which is populated from the Finance Amount tab under Program Setups.
- Select Option Asset Usage: Specify how the asset will be used (e.g., for commercial or non-commercial purposes). This information is populated from the Asset Usage tab in General Setups.
- Select Option for Down Payment Type: Choose the type of down payment, such as a percentage. This indicates whether the down payment amount will be calculated based on a percentage of the total financing amount.
- Default Value: Enter the percentage rate for the down payment. Additionally, users can define a Minimum Value and a Maximum Value to establish a range for the down payment in the chart or criteria.
- Ellipsis Menu for Chart: An ellipsis menu is available on the right side of each chart, providing options to Rename, Delete or Add Criteria. When renaming, only the chart name and status can be modified. Deletion is restricted to charts that are not linked to a financial product (FP). Users can add new criteria to the chart and once saved, the chart will include the updated criteria.

Down Payment Charts
- Ellipsis Menu for Criteria: Each criterion has an ellipsis menu that allows users to Edit or Delete the criterion. Criteria linked to FPs or related to past dates cannot be modified or deleted.
- Validations:
- No Overlapping Criteria: Charts cannot have overlapping effective dates or criteria.
- Deletion Restrictions: A chart cannot be deleted if it is linked to a financial product (FP).
- Locked Criteria: Criteria associated with past dates or locked configurations cannot be edited.

Down Payment Charts Edit Delete Criteria
Commission
The Commission chart is used to configure and manage commission structures for various financing programs. This chart allows users to define commission rates and criteria based on different business parameters. Users can specify commission percentages or amounts, applicable terms and conditions under which commissions are paid. By setting up Commission charts, users ensure that all commission-related details are accurately recorded and applied in line with the lender's policies. Users can configure multiple Commission charts, each requiring a unique name. The chart configuration requires input for Chart Name, Chart Status, Business Criteria and Output Parameters.

Commission Charts Add New Record
To manage Commission charts, follow these steps:
- Add New Chart: Click the Add New Chart button to define the details of a new Commission chart. Each chart must have a unique name and overlapping charts are not allowed. Input the chart name, select its status, define business criteria and specify output parameters.
- Input Chart Name: Enter a unique name for the Commission chart. This will serve as a reference for the chart when needed.
- Select Option for Commission Type: Choose the type of commission, either Percentage or Amount. In the case of Percentage, the commission is calculated as a percentage of the financed amount, while for Amount, the commission is a fixed sum.
- Select Option Status: Choose whether the chart will be Enabled or Disabled. Enabled charts will be available for use, while disabled charts will be hidden from future operations.
- Select Options for Asset Make/Model/Trim: Choose the asset’s make, model and trim from the drop-down lists. These options are populated from the Asset Catalogue in General Setups under Company Configurations.
- Select Option Purchase Option: Define whether a purchase option is applicable at the end of the term.
- Select Option Asset Condition: Define the condition of the asset. The available options are populated from the Asset Condition tab in General Setups.
- Select Option for Finance Type(s): Define whether the chart applies to Finance, Lease or both.
- Select Option Customer Type: Choose the customer type related to the chart.
- Select Option Asset Category: Specify the asset category to which the chart applies.
- Select Option Asset Type: Choose the asset type.
- Select Option Product Type: Indicate the product type involved in the chart.
- Select Option Terms: Define the term range for the chart, such as 1-12 months or 13-24 months. These options are set in the Term tab under Program Setups.
- Select Option Credit Score: Indicate the customer’s credit score, ranging from excellent to poor. The available options are populated from the Credit Score tab under Program Setups.
- Select Option Finance Amount Range: Choose the finance amount range, populated from the Finance Amount tab under Program Setups.
- Select Option Asset Usage: Specify how the asset will be used (e.g., for commercial or non-commercial purposes). This information is populated from the Asset Usage tab in General Setups.
- Output Parameters for Commission Type (Amount): If Amount is selected as the Commission Type, input the following values:
- Default Commission Amount: Enter the default commission amount.
- Minimum Commission Amount: Set the minimum commission amount.
- Maximum Commission Amount: Set the maximum commission amount.
- Output Parameters for Commission Type (Percentage): If Percentage is selected as the Commission Type, input the following values:
- Calculation Basis: Select an option from the drop-down list, which includes Asset Cost Including Tax, Asset Cost Excluding Tax, Net Finance Amount and Interest Income. The commission will be calculated based on the selected option.
- Default Commission Percentage: Enter the default percentage for the commission.
- Minimum Commission Percentage: Set the minimum percentage for the commission.
- Maximum Commission Percentage: Set the maximum percentage for the commission.
- Commission Amount Split: The commission amount can be split as a percentage across multiple entities, such as GL, Customer, Manufacturer and Sales Representative. The total split percentage cannot exceed 100%.
- Ellipsis Menu for Chart: Each chart has an ellipsis menu on the right side, providing options to Rename, Delete or Add Criteria. When renaming, only the chart name and status can be modified. Deletion is restricted to charts that are not linked to a financial product (FP). New criteria can be added and once saved, the chart will include the updated criteria.

Commission Charts
- Ellipsis Menu for Criteria: Each criterion has an ellipsis menu that allows users to Edit or Delete the criterion. Criteria linked to FPs or related to past dates cannot be modified or deleted.
- Validations:
- No Overlapping Criteria: Charts cannot have overlapping effective dates or criteria.
- Deletion Restrictions: A chart cannot be deleted if it is linked to a financial product (FP).
- Locked Criteria: Criteria associated with past dates or locked configurations cannot be edited.

Commission Charts Edit Delete Criteria
Subsidy
The Subsidy chart is used to configure and manage subsidies associated with various financing programs. This chart allows users to define subsidy amounts or percentages and the criteria under which they apply. Users can configure multiple subsidy charts with unique names. While defining a new chart, the required information includes the Chart Name, Chart Status, Business Criteria and Output Parameters.

Subsidy Charts Add New Record
To manage Subsidy charts, follow these steps:
- Add New Chart: Click the Add New Chart button to define the details of a new Subsidy chart. Each chart must have a unique name and overlapping charts are not allowed. Input the chart name, select its status, define business criteria and specify output parameters.
- Input Chart Name: Enter a unique name for the Subsidy chart. This will serve as a reference for the chart when needed.
- Select Option for Subsidy Type: Choose the type of subsidy: Target Base Rate, % from Dealer and % from Manufacturer or Adjusted Customer Rate.
- Select Option Status: Choose whether the chart will be Enabled or Disabled. Enabled charts will be available for use, while disabled charts will not be available for future operations.
- Select Options for Asset Make/Model/Trim: Choose the asset’s make, model and trim from the drop-down lists. These options are populated from the Asset Catalogue in General Setups under Company Configurations.
- Select Option Asset Condition: Define the condition of the asset. The available options are populated from the Asset Condition tab in General Setups.
- Select Option Terms: Define the term range for the chart, such as 1-12 months or 13-24 months. These options are set in the Term tab under Program Setups.
- Select Option Credit Score: Indicate the customer’s credit score, ranging from excellent to poor. The available options are populated from the Credit Score tab under Program Setups.
- Select Option Finance Amount Range: Choose the finance amount range, which is populated from the Finance Amount tab under Program Setups.
- Select Option Asset Usage: Specify how the asset will be used (e.g., for commercial or non-commercial purposes). This information is populated from the Asset Usage tab in General Setups.
- Output Parameters for Subsidy Type (Target Base Rate):
- Financier Rate: Enter the financier's rate.
- Dealer Contribution: Specify the dealer's contribution rate.
- Manufacturer Contribution: Define the manufacturer's contribution rate.
- Output Parameters for Subsidy Type (% from Dealer and % from Manufacturer):
- Dealer Rate: Input the percentage rate provided by the dealer.
- Manufacturer Rate: Input the percentage rate provided by the manufacturer.
- Output Parameters for Subsidy Type (Adjusted Customer Rate):
- Rate: Input the adjusted customer rate as a percentage value.
- Ellipsis Menu for Chart: Each chart has an ellipsis menu on the right side, providing options to Rename, Delete or Add Criteria. When renaming, only the chart name and status can be modified. Deletion is restricted to charts that are not linked to a financial product (FP). New criteria can be added and once saved, the chart will include the updated criteria.

Subsidy Charts
- Ellipsis Menu for Criteria: Each criterion has an ellipsis menu that allows users to Edit or Delete the criterion. Criteria linked to FPs or related to past dates cannot be modified or deleted.
- Validations:
- No Overlapping Criteria: Charts cannot have overlapping effective dates or criteria.
- Deletion Restrictions: A chart cannot be deleted if it is linked to a financial product (FP).
- Locked Criteria: Criteria associated with past dates or locked configurations cannot be edited.

Subsidy Charts Edit Delete Criteria
Fees
The Fees chart is used to configure and manage fees associated with various financing programs. This chart allows users to define fee amounts or percentages and the criteria under which they apply. Users can configure multiple Fees charts, each with a unique name. When defining a new chart, the required information includes the Chart Name, Chart Status, Business Criteria and Output Parameters.

Fees Charts Add New Record
To manage Fees charts, follow these steps:
- Add New Chart: Click the Add New Chart button to define the details of a new Fees chart. Each chart must have a unique name and overlapping charts are not allowed. Input the chart name, select its status, define business criteria and specify output parameters.
- Input Chart Name: Enter a unique name for the Fees chart. This name will serve as a reference for the chart when needed.
- Select Option Status: Choose whether the chart will be Enabled or Disabled. Enabled charts will be available for use, while disabled charts will not be available for future operations.
- Select Option Customer Type: Define the customer type associated with the chart.
- Select Option Product Type: Indicate the product type involved in the chart.
- Select Option for Finance Type(s): Define whether the chart applies to Finance, Lease or both.
- Select Option Financed Amount: Choose the financed amount range, which is populated from the Finance Amount tab under Program Setups.
- Select Option Terms: Define the term range for the chart, such as 1-12 months or 13-24 months. These options are set in the Term tab under Program Setups
- Select Option Asset Condition: Define the condition of the asset. The available options are populated from the Asset Condition tab in General Setups.
- Select Option Asset Category: Specify the asset category to which the chart applies.
- Select Option Asset Type: Choose the asset type.
- Input Fee Name: Enter the name of the fee. For example, fees can include processing fees, fees for non-tax payers or fees for tax payers.
- Select Option for Fee Type: Choose whether the fee is One Time or Periodic from the drop-down list.
- Select Option for Fee Frequency:
- If the Fee Type is One Time, select from the Fee Frequency drop-down list, with options such as On the Start Date, With First Regular Payment or With Last Regular Payment.
- If the Fee Type is Periodic, select from the Fee Frequency drop-down list, with options such as With Every Payment, Monthly, Quarterly, Semi-Annual or Annual.
- Select Option for Due At Start Date: Choose Yes or No from the drop-down list.
- Input Fee Amount: Enter the specific amount for the fee.
- Select Option for Override: Choose Yes or No from the drop-down list to specify if the fee can be overridden.
- Ellipsis Menu for Chart: Each chart has an ellipsis menu on the right side, providing options to Rename, Delete or Add Criteria. When renaming, only the chart name and status can be modified. Deletion is restricted to charts that are not linked to a financial product (FP). New criteria can be added and once saved, the chart will include the updated criteria.

Fees Charts
- Ellipsis Menu for Criteria: Each criterion has an ellipsis menu that allows users to Edit or Delete the criterion. Criteria linked to FPs or related to past dates cannot be modified or deleted.
- Validations:
- No Overlapping Criteria: Charts cannot have overlapping effective dates or criteria.
- Deletion Restrictions: A chart cannot be deleted if it is linked to a financial product (FP).
- Locked Criteria: Criteria associated with past dates or locked configurations cannot be edited.

Fees Charts Edit Delete Criteria